A practical, step-by-step guide to creating a website that attracts customers and drives sales
Here’s the good news: “You don't need to be tech-savvy to have a great website.”
This guide will help you out and de-mystify the process!
You don’t need to know how to code. You don’t need to understand servers or databases or CSS. You don’t need to become a web designer.
What you need is clarity about what your website should accomplish, what it should say, smart decisions about how to build it, and the confidence to avoid the expensive mistakes that sink most first-time website projects.
The secret? Decide what should it say and what should it look like BEFORE you hire anyone.
When you can show a designer examples of what you want and hand them clear copy, the entire process becomes faster, cheaper, and dramatically less painful.
That’s what this guide will give you.
You’re a business owner who knows you need a website. Maybe you’re starting from scratch, or maybe you have something that’s not working and you need to rebuild it right.
You feel overwhelmed by the options. Wix or WordPress? Squarespace or Shopify? Do it yourself or hire someone? How much should it cost? What pages do you actually need?
You’ve probably heard horror stories - people who spent $10,000 and got nothing, developers who disappeared, websites that don’t work on phones, contact forms that go straight to spam.
This guide cuts through the confusion.
By the end of this ebook, you’ll have:
Read the chapters in order. Each one builds on the last.
Fill in the exercises as you go. They’re designed to force clear thinking and give you specific outputs you’ll use later.
Don’t skip the testing chapter. Most website failures happen because people rush to launch without proper testing.
Throughout this guide, you’ll see examples from Sarah’s Meal Prep Co. - a healthy meal delivery service run by Sarah Chen. She serves busy professionals in suburban Denver. Her website needs to showcase menu photos, build trust with testimonials, process online orders, and make ordering dead simple.
We’ll use Sarah as a running example so you can see how each concept applies to a real business.
Let’s get started.
Let’s figure out what your website actually needs to accomplish - before you spend a dollar building it.
The 3 things you must take away from this chapter
Not every business needs a website.
There. I said it.
If you’re selling handmade candles at local craft fairs and all your customers find you through Instagram, you might not need a full website yet. A strong Instagram profile and maybe an Etsy shop could be enough for now.
But here’s the truth: most businesses DO need a website. And almost every business will eventually need one.
Credibility. When someone hears about you, the first thing they do is Google you. No website? You look unprofessional or worse, like you don’t exist. A polished website builds instant trust.
Control. You don’t own your Facebook page or Instagram account. They can change algorithms, shut you down, or disappear tomorrow. Your website is yours. You control it completely.
24/7 sales machine. Your website works when you sleep. It answers questions, generates leads, and processes orders without you lifting a finger.
SEO matters. People search Google for what you offer. Without a website, you’re invisible in search results. Your competitors with websites get found. You don’t.
Professional communication. Email from “sarah@sarahsmealprep.com” looks legitimate. Email from “sarahchen83@gmail.com” looks amateur. You need a domain to have professional email.
Every business website exists to do one or more of these four things:
1. Build trust and credibility. Prove you’re legitimate so people feel safe doing business with you. Show testimonials, credentials, real photos, professional design. This matters most for service businesses and local businesses where trust is the barrier to purchase.
2. Generate leads. Capture contact information - emails, phone calls, form submissions - so you can follow up and close the sale later. This is the primary goal for high-ticket services, B2B businesses, and anything with a longer sales cycle.
3. Sell products directly. Process transactions online and deliver products or services without human intervention. This requires shopping cart, checkout, payment processing, and fulfillment systems. Essential for ecommerce businesses.
4. Provide information. Educate customers, answer questions, showcase expertise. This supports the other three goals - rarely the primary purpose on its own unless you’re a media company or educational institution.
Your website might serve two of these purposes. But you need to know which one or two matter most. Design around those. Everything else is secondary.
My website’s #1 job is to:
My website’s #2 job is to:
(Pick from: Build trust, Generate leads, Sell products, Provide information)
Sarah’s Meal Prep Co. Example:
My website’s #1 job is to: Sell meal prep packages directly through online ordering.
My website’s #2 job is to: Build trust by showcasing food photography, customer testimonials, and nutritional information.
You might not need a website if:
But even in these cases, plan to build one eventually. A website gives you control and credibility that platforms never will.
The most expensive mistake founders make: spending $5,000-$15,000 on a beautiful website for a business nobody wants.
Before you invest in a website, validate demand:
Proof of demand first. Website second. This order saves you thousands.
Based on your primary purpose, here’s what you need:
If your #1 job is TRUST: Simple 5-page informational site. Homepage, About, Services, Testimonials, Contact. Platform: Squarespace or Wix. Cost: $500-$2,000.
If your #1 job is LEADS: Website with strong calls-to-action, contact forms, possibly scheduling integration. Platform: WordPress or Squarespace. Cost: $1,000-$5,000.
If your #1 job is SELLING: Full ecommerce site with shopping cart, checkout, payment processing. Platform: Shopify or WooCommerce. Cost: $2,000-$10,000+.
If your #1 job is INFORMATION: Content-heavy site, likely with blog. Platform: WordPress. Cost: $1,500-$5,000.
We’ll dive into platform choices in the next chapter. For now, just identify your purpose.
Let’s pick the platform that matches your purpose, budget, and technical comfort level - so you don’t outgrow it in six months.
The 3 things you must take away from this chapter
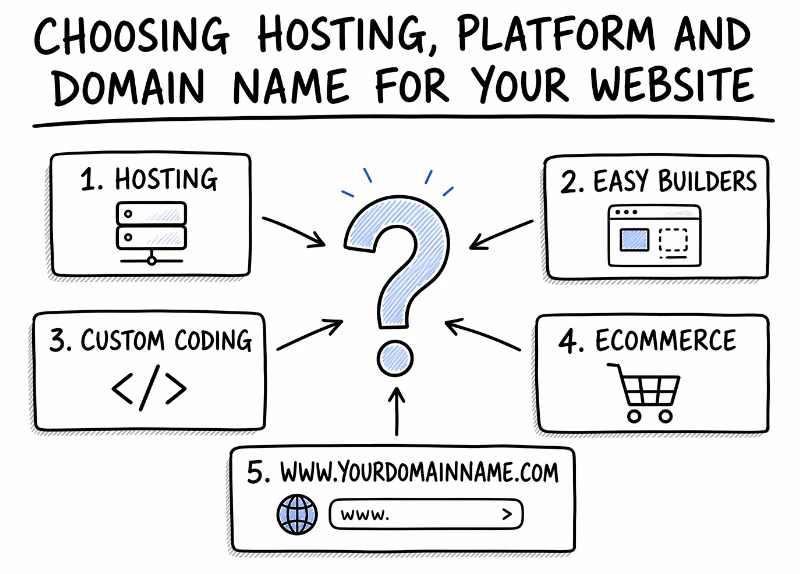
Hosting: This is the server company, like Bluehost, GoDaddy, Wix, etc. It's where to go online to log into your website owner/admin area.
Designer/Developer: This is the person who makes your website design and makes your website work properly. Sometimes it's the same person, sometimes different people do each role.
Your Domain or URL: This is your website address like www.BillsBurgers.com or YummyYogurt.com, etc.
Website Builder software: This is the very common set of online "drag and drop" builder tools that many hosting platforms offer (GoDaddy, Wix, Squarespace, etc). It's designed to allow non-programmers to build their website, with friendly web page building tools.
Choose the wrong one and you’ll hit limitations in six months. Need ecommerce but built on a basic website builder? You’ll rebuild from scratch. Want to add a blog but chose a platform without good content tools? You’re stuck.
Choose right and your website grows with your business for years.
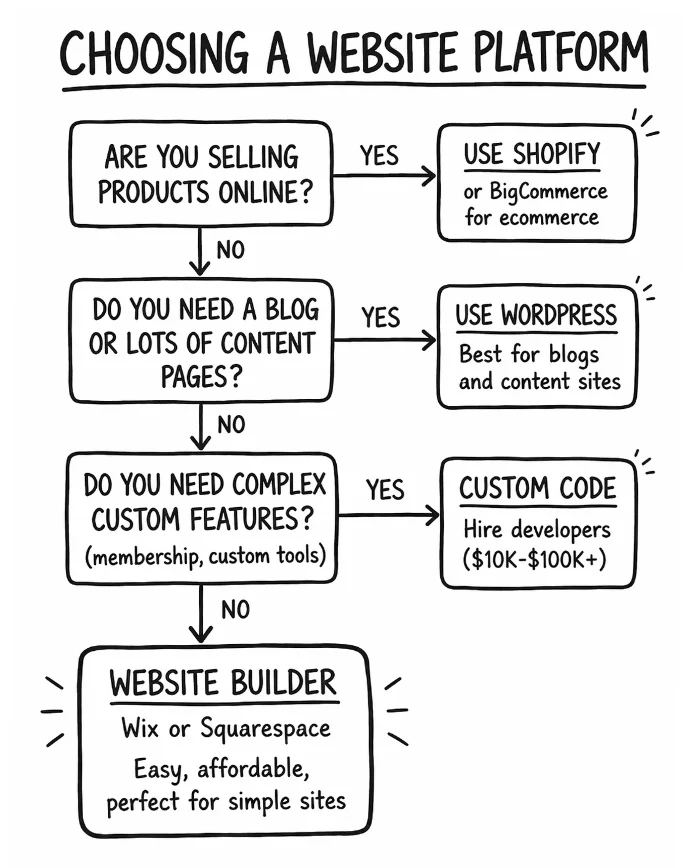
Website Builders (Wix, Squarespace): Drag-and-drop editors. Hosting included. Limited customization. Best for simple sites - portfolios, small service businesses, landing pages. $16-$65/month. Easy to use. Hard to scale beyond basics.
WordPress: Extremely flexible content management system. Endless plugins for any feature. Requires separate hosting ($3-$25/month). Steeper learning curve. Best for blogs, content-heavy sites, and businesses that want full control. Can do ecommerce with WooCommerce plugin.
Ecommerce Platforms (Shopify, BigCommerce): Built specifically for selling products online. Shopping cart, checkout, payment processing, inventory management all included. $39-$399/month. Best for online stores with 10+ products. Overkill if you’re not selling online.
Custom Coded: Hire developers to build exactly what you want. Complete control. Expensive ($10K-$100K+). Long timeline (3-12 months). Best for complex unique needs - membership sites, custom functionality, enterprise-level businesses. Massive overkill for most small businesses.
Budget: What can you afford monthly AND upfront? Website builders charge monthly fees. WordPress requires hosting plus potential theme/plugin costs. Custom development is large upfront expense. Factor in domain registration ($12-$15/year), any premium themes or templates ($30-$200), and potential designer fees.
Ease of maintenance: Will YOU be updating content weekly? Or hiring someone each time you need a change? If you plan to update it yourself, choose something with a friendly interface that you feel comfortable editing yourself. WordPress has a learning curve. Website builders are more intuitive.
Depth of features needed: Simple 5-page informational site? Any platform works. Blog with 100+ articles and categories? WordPress excels. Online store with 500 products? Use Shopify. Complex custom functionality? You need custom code.
Ability to scale: If your traffic explodes or you add 500 products, can the platform handle it? Website builders have limitations. WordPress and Shopify scale well. Custom sites scale if built properly.
| Platform | Best For | Monthly Cost | Ease of Use | Customization |
|---|---|---|---|---|
| Wix / Squarespace | Simple sites, portfolios | $16-$65 | Very easy | Limited |
| WordPress | Blogs, content sites | $3-$25 + hosting | Moderate | Extensive |
| Shopify | Online stores | $39-$399 | Easy | Moderate |
| Custom Code | Complex unique needs | $0 + dev costs | Hardest | Unlimited |
Answer these three questions:
1. What’s your realistic budget?
Low ($0-$500 total) / Medium ($500-$5K) / High ($5K+)
2. What’s your technical comfort level?
Beginner / Intermediate / Advanced
3. What’s your primary purpose?
Information / Blog / Ecommerce / Custom functionality
If you answered Low budget + Beginner + Information: Use Wix or Squarespace.
If you answered Medium budget + Intermediate + Blog: Use WordPress with a premium theme.
If you answered Medium-High budget + Any level + Ecommerce: Use Shopify.
If you answered High budget + Any level + Custom functionality: Hire custom development.
Sarah’s Meal Prep Co. Decision:
Budget: Medium ($3,000 total)
Technical comfort: Beginner (Sarah hasn’t built a website before)
Primary purpose: Sell meal prep packages online
Best platform: Shopify. Built for ecommerce, easy to use, handles payments and inventory, mobile-friendly templates, and Sarah can manage orders herself. At $79/month for the plan she needs, it fits her budget.
Don’t choose a platform because it’s cheap if you need ecommerce capabilities it can’t provide.
Don’t choose custom development if you just need five pages and a contact form - massive overkill.
Don’t choose WordPress just because “everyone uses it” if you have no interest in learning the platform.
Don’t choose based on your friend’s recommendation without understanding if their needs match yours.
Let’s get your domain registered and hosting set up correctly - so you own everything and avoid expensive mistakes.
The 3 things you must take away from this chapter
Your domain name is your digital address. Your hosting is the land your website sits on.
Get these two things right from the start and you’ll save yourself massive headaches later.
Get them wrong and you’ll face expensive buybacks, control issues, or technical disasters.
Your domain should be simple, memorable, and clearly related to your business.
Good domain examples:
Bad domain examples:
Keep it short. Under 15 characters if possible. Long domains are hard to remember, hard to type, and look unprofessional on business cards.
Make it easy to spell. If you have to explain how to spell it, it’s the wrong domain. Avoid words with multiple common spellings.
Use .com if you can. People default to typing “.com” even if you tell them otherwise. .com is still the gold standard. .co, .net, and .io are acceptable alternatives if .com is taken. Avoid .biz, .info, .guru - they look spammy.
Avoid hyphens and numbers. “best-meal-prep.com” requires explaining “that’s best DASH meal DASH prep.” Numbers are ambiguous: is it “4” or “four”?
Don’t use trademarked names. Using “UberMeals” will get you a cease-and-desist letter. Check USPTO.gov to verify your name isn’t already trademarked.
Use a reputable domain registrar. The big three:
Cost: $12-$15/year for .com domains. If someone quotes you $50+/year, they’re overcharging.
Privacy protection: When you register a domain, your personal contact info becomes public in the WHOIS database. Buy privacy protection (often called “WHOIS privacy”) for $5-$10/year. This hides your personal info and reduces spam.
This is non-negotiable. YOU must be the registrant.
Use YOUR email address. Use YOUR credit card. You are the account owner.
NEVER let a developer or agency register your domain in their name. Horror story: developer registers the domain, relationship sours, developer demands $5,000 to transfer it back. Or they disappear and you lose the domain entirely.
If a developer says they need to register it for you, that’s a massive red flag. Walk away.
Hosting is where your website’s files live. It’s the server that delivers your site when someone types your domain. Any company that allows you to have a website is a host, whether it's custom-built, drag and drop, or somewhere in between.
If you use Wix, Squarespace, or Shopify: Hosting is included. You don’t need to buy separate hosting.
If you use WordPress or custom code: You need hosting. Choose a reliable host, not the cheapest.
Hosting is where your website’s files live. It’s the server that delivers your site when someone types your domain.
Platforms - like Wix, Squarespace, and Shopify offer "Drag and Drop" website building, and include hosting as part of their platform / service. You don’t need to buy separate hosting.
Many business owners do fine with an easy builder platform like Wix, Sqaurespace, GoDaddy, Shopify etc.
If you need something pretty customized, especially with complicated features that easy builders don't offer, you may decide to custom code your website using programmers/web developers.
WordPress is also REALLY popular and it's sort of in-between easy builder and custom.
SiteGround: $15-$30/month. Excellent uptime, great support, managed WordPress hosting. Worth the extra cost.
Bluehost: $3-$13/month. Cheap but decent. Official WordPress recommendation. Good for tight budgets.
WP Engine: $30-$60/month. Premium managed WordPress hosting. Fast, secure, best support. Overkill for most small businesses initially.
Avoid bottom-tier hosts like Hostgator or GoDaddy shared hosting. Their $3/month plans are slow, oversold, and have terrible uptime. You get what you pay for.
Uptime guarantee: Look for 99.9%+ uptime. Downtime costs you customers and Google rankings.
SSL certificate included: SSL (the “https://” in your URL) is required for trust and SEO. Most hosts include it free. If they charge extra, choose a different host.
Automatic backups: Daily backups protect you from disasters. Verify they’re happening and learn how to restore.
Email hosting: Some hosts include email (yourname@yourdomain.com). Otherwise use Google Workspace ($6/month/user) or Microsoft 365.
Support quality: When your site breaks at 9 PM, can you reach someone who can help? Read reviews about support responsiveness.
☐ Domain registered at GoDaddy, Namecheap, or Google Domains
☐ Domain registered in MY name with MY email address
☐ Privacy protection enabled
☐ Hosting chosen (if needed) with SSL included
☐ Hosting registered in MY name with MY email address
☐ Domain pointed to hosting (or platform if using Wix/Shopify)
☐ Business email set up (yourname@yourdomain.com)
Sarah’s Setup:
Domain: sarahsmealprep.com registered at Namecheap for $13/year
Hosting: Not needed (Shopify includes hosting)
Email: Google Workspace for sarah@sarahsmealprep.com ($6/month)
Total annual cost: $13 (domain) + $72 (email) = $85/year for domain and email
Let’s build the right pages with the right information - so visitors know what you do and what to do next.
The 3 things you must take away from this chapter
You don’t need 50 pages.
You need the RIGHT pages with the RIGHT information on them.
Most small business websites need five core pages. Some need fewer. A few need more. But start with these five and you’ll cover 90% of what visitors need to know.
1. Homepage - Your first impression. What you do, why you’re different, clear next step.
2. About Us - Your story, mission, values. Builds trust and connection.
3. Products/Services - What you offer and what it costs (or “Contact for pricing” if truly custom).
4. Contact - How to reach you. Form, email, phone, address if applicable.
5. Blog/Resources (optional but recommended) - For SEO and demonstrating expertise. Skip this if you have no plans to create content regularly.
Your homepage has one job: answer three critical questions in 3 seconds.
What do you do?
Why should I trust you?
What do I do next?
If visitors can’t answer these immediately, you lose them.
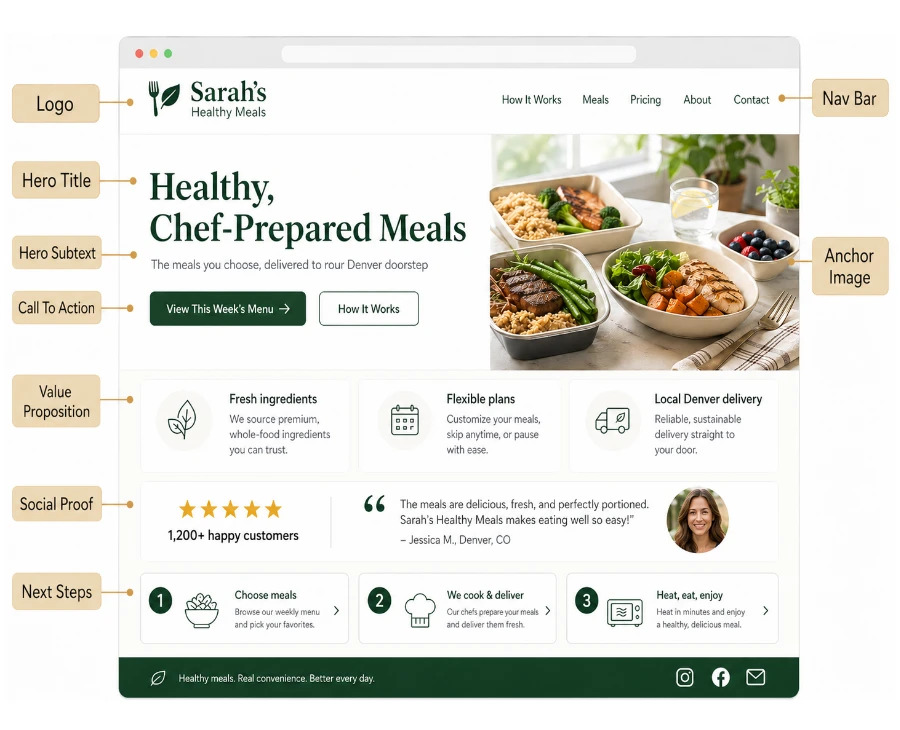
What goes on your homepage:
Sarah’s Homepage Layout:
H1: “Healthy, Chef-Prepared Meals Delivered to Your Denver Doorstep”
H2: “Organic ingredients, macro-balanced nutrition, zero prep time. Order weekly and eat better without cooking.”
Hero image: Beautiful photo of colorful meal prep containers arranged on a kitchen counter
CTA button: “Browse This Week’s Menu” (bright green, center screen)
Social proof: “4.9 stars from 200+ Denver customers” with customer review photos
How it works: 1) Choose your meals, 2) We cook and deliver, 3) Heat and eat in 3 minutes
This page builds trust. Don’t make it all corporate jargon. Tell a real human story.
Include:
Skip the buzzwords (“synergistic solutions,” “innovative paradigm”). Write like a human talking to another human.
Be specific. Be clear. Show pricing if possible.
Include:
Hiding pricing when you could be transparent costs you leads. People leave to find a competitor who shows prices.
Make it easy to reach you. Every barrier you add reduces conversions.
Include:
Test your contact form before launch. Forms that go to spam or don’t send at all are shockingly common.
For each page, ask: Can someone understand what this page is about and what they should do in 3 seconds?
If not, simplify.
Keep your navigation links consistent from page to page, up in top area, your masthead. Customers get used to seeing them in same place, so don't shift or shuffle them.
Your website copy MUST be clear, compelling copy that tells visitors what they get and why they should care - without confusing them.
The 3 things you must take away from this chapter
You MUST MUST MUST communicate your VALUE to the customer if you do nothing else. Most founders are too close to their own product - and struggle to quickly and clearly communicate the value that the customer needs to understand.
Most founders hire a designer first.
They think: “I don’t know what I want. The designer will figure it out.”
Then they spend weeks going in circles. The designer sends mockups. You say “that’s not quite right.” They revise. You say “still not it.” More revisions. More confusion. More money.
The problem isn’t the designer. The problem is you asked them to read your mind.
There’s a better way: write your core content BEFORE you hire anyone.
Designers design around content. If you don’t have content, they’ll fill your mockups with lorem ipsum placeholder text. Then when you add real content later, nothing fits right.
You don’t need every word written. But you need these three things ready:
Hero Title: The main headline visitors see when they land on your homepage. This is your one-sentence answer to “what do you do and who is it for?”
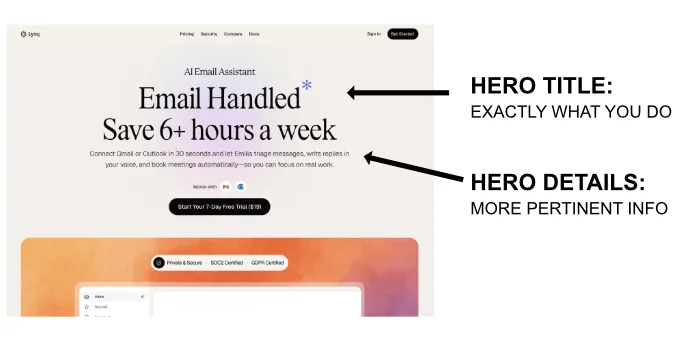
Hero Subtext: The 1-2 sentence supporting text directly below the hero title. This adds context or clarifies what makes you different.
3-5 Main Value Points: The key reasons someone should choose you. Think of these as your short-list sales pitch. They might become the three boxes below your hero section or the bullet points on your About page.
Get these written now. Before you talk to any designer. They don’t need to be perfect - you can refine later. But having real content instead of “we’ll figure it out later” changes everything.
Hero Title:
Hero Subtext:
Main Value Point #1:
Main Value Point #2:
Main Value Point #3:
REMEMBER: Customers want to know how you’ll transform them. What will they get from you specifically? They are less interested in facts about YOUR business, you need to tell them what’s in it for THEM.
Sarah’s Meal Prep Co. Example:
Hero Title: “Healthy, Chef-Prepared Meals Delivered to Your Denver Doorstep”
Hero Subtext: “Organic ingredients, macro-balanced nutrition, zero prep time. Order weekly and eat better without cooking.”
Main Value Point #1: “100% organic produce and grass-fed proteins - nutrition you can trust.”
Main Value Point #2: “Customizable macros for any diet - keto, paleo, vegan, or high-protein.”
Main Value Point #3: “Delivered fresh twice weekly - never frozen, always delicious.”
Good website copy follows a simple pattern:
1. State the problem clearly. Show you understand what they’re struggling with.
2. Present your solution. What you offer and how it solves their problem.
3. Show proof it works. Testimonials, case studies, numbers, credentials.
4. Make it easy to take the next step. Clear call-to-action with no friction.
Use simple words. Write at an 8th-grade reading level. “We deliver fresh meals in 2 days” beats “innovative culinary distribution paradigm.”
Be specific. “We’ve served 500+ Denver customers” is better than “We serve many happy customers.” Numbers build credibility.
Focus on benefits, not features. “Save 5 hours per week” (benefit) beats “Weekly meal delivery” (feature).
Use active voice. “We cook your meals” is stronger than “Your meals are cooked.”
Keep paragraphs short. 2-3 sentences maximum. White space makes copy scannable.
Avoid jargon and buzzwords. “Synergy,” “paradigm shift,” “revolutionary” - these mean nothing. Be concrete.
People trust what other people say about you more than what you say about yourself.
Collect and display:
Place social proof on every page, especially near calls-to-action. Testimonials next to “Buy Now” buttons increase conversions.
Every page needs a clear CTA telling visitors what to do next.
Good CTAs are:
CTA placement: Above the fold on homepage (visible without scrolling), at the end of every page, and in the navigation menu.
☐ Hero headline clearly states what you do
☐ Subheadline explains who it’s for or what makes you unique
☐ 3-5 main value points written (benefits, not features)
☐ About page tells your story in human language
☐ Services/products described specifically with pricing
☐ Customer testimonials collected and placed strategically
☐ Clear CTA on every page
☐ All copy proofread (no typos or grammar errors)
Let’s make smart decisions about design - whether you hire help or DIY with a template.
The 3 things you must take away from this chapter
Here’s the truth most business guides won’t tell you:
If you want a truly professional-looking website that builds trust and drives sales, most non-technical founders should hire a designer.
DIY with a template can work. You can absolutely create something decent. But professional design is an investment that pays for itself in credibility, conversions, and time saved.
DIY works if:
Hire a designer if:
The honest assessment: if you’re selling to customers (not just providing information), hire help. Your website is your 24/7 salesperson. Make it look the part.
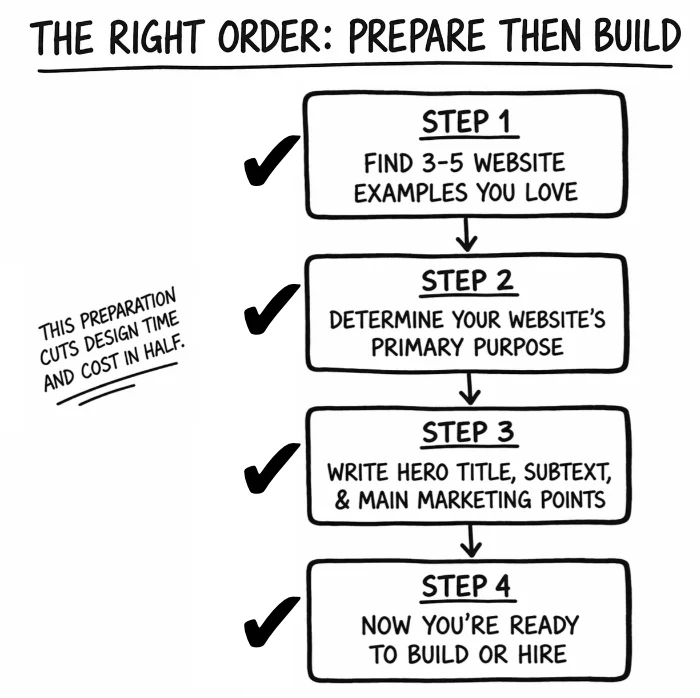
Step 1: Find 3-5 websites you wish were yours. Any industry. Just sites that make you think “I want mine to feel like that.” Screenshot them or bookmark them. This is your “show them this” reference guide.
Step 2: Write your core content first. Hero title, subtext, and main value points. Hand this to the designer so they design around real content, not placeholder text.
Step 3: Find designers.
Step 4: Evaluate before hiring.
Step 5: Show them your examples and content on day one. Say: “I want the feel of this site, with the layout of this one, and here’s my actual content.” This eliminates weeks of guessing.
Sarah’s Designer Hiring Process:
Sarah found three websites she loved: a spa site with calming colors, a restaurant with beautiful food photography, and a delivery service with clear ordering flow.
She wrote her hero content and main value points.
She hired a designer from Upwork for a $300 test project (design her logo and one homepage mockup).
The designer delivered quality work and communicated well.
She hired them for the full site ($2,500 for 5 pages on Shopify, 3 weeks timeline).
Because she showed examples and provided content upfront, the first draft was 85% right. Minor revisions only. Done in 3 weeks.
NEVER pay 100% upfront. You lose all leverage. Use milestone payments: 25% to start, 25% at design approval, 25% after beta testing, 25% upon final delivery.
Get a contract. Include scope of work (which pages, which features), timeline, payment schedule, revision limits, and who owns the files.
YOU must own these assets:
If a designer wants to register your domain or host in their name, walk away. Massive red flag.
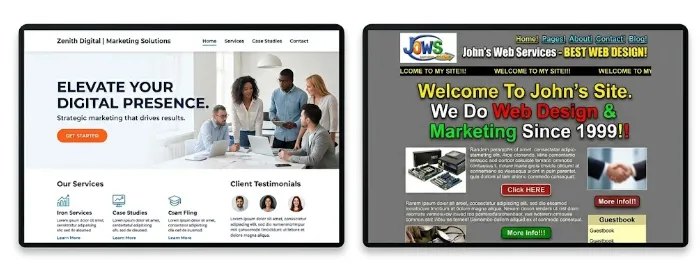
Even with a template, follow these rules and you’ll look more professional than 80% of small business sites.
1. Use white space. Breathing room around elements prevents clutter. Margins matter. Don’t cram everything together.
2. Limit your colors. Three colors maximum (plus black, white, gray). More than that looks chaotic.
3. Limit your fonts. Two to three typefaces max. One for headings, one for body text. Mixing five fonts looks unprofessional.
4. Create visual hierarchy. Important stuff should be big and bold. Less important stuff smaller. Your eye should know where to look first.
5. Keep text scannable. Short paragraphs (2-3 sentences). Bullet points. Subheadings every 2-3 paragraphs. Nobody reads walls of text.
6. Use high-quality images. Crisp, well-lit photos. No dim, fuzzy, or poorly cropped images. Stock photos are fine if they look real (not cheesy corporate handshakes).
7. Make it mobile-friendly. Sixty percent of traffic is mobile. Test on your phone before launch. If it doesn’t work on mobile, it doesn’t work.
8. Keep navigation simple. Five to seven main menu items maximum. Visitors should never wonder where to click next.
Show it to five people in your target market (not friends or family). Ask:
If they can’t answer clearly in 5 seconds, your design needs work.
Let’s handle the technical essentials that make or break the user experience - without getting overwhelmed.
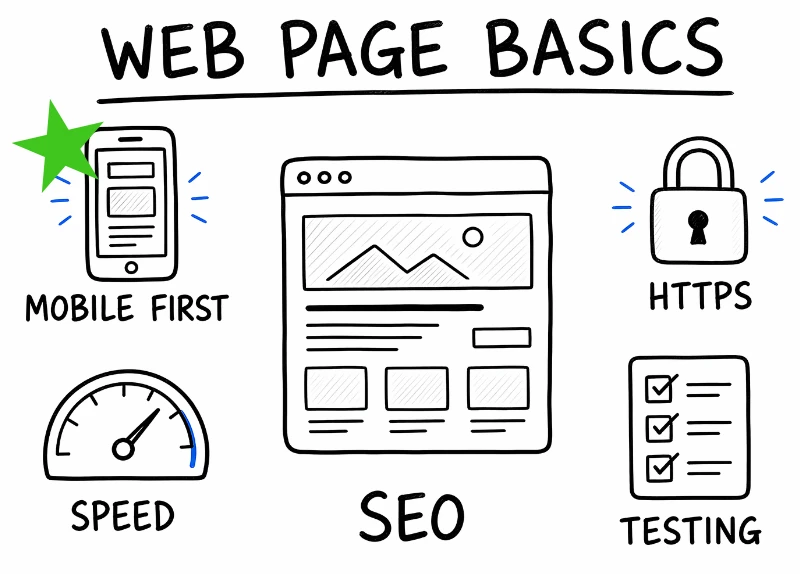
The 3 things you must take away from this chapter
You don’t need to be technical to get these right.
But you DO need to verify these three things are working, or your beautiful website will fail at its job.
60% of web traffic is mobile. Google ranks mobile-friendly sites higher. Customers expect sites to work perfectly on phones.
If your site doesn’t work on mobile, you’re losing more than half your potential customers.
What “mobile-friendly” means:
How to test: Pull out your phone and actually use your site. Try to complete the main action (order, contact, sign up). If anything is hard or broken, fix it before launch.
Test on multiple devices if possible: iPhone, Android, iPad. Borrow friends’ phones. See what real users will see.
Google’s Mobile-Friendly Test: Visit search.google.com/test/mobile-friendly and enter your URL. Google will tell you if your site passes.
Visitors expect sites to load in under 3 seconds. If it takes 5+ seconds, 40% of people leave before seeing anything.
Slow sites also rank lower in Google. Speed affects both conversions and SEO.
How to test speed: Go to pagespeed.web.dev and enter your URL. Google will score your site (0-100) and tell you what to fix.
Common speed killers and fixes:
Aim for a PageSpeed score of 80+ on mobile. Anything under 50 needs serious work.
SSL (Secure Sockets Layer) encrypts data between your site and visitors. It’s the difference between “http://” and “https://” in your URL.
Why it matters:
Good news: Most hosting providers and platforms include SSL free. Squarespace, Wix, Shopify - it’s automatic. WordPress hosting usually includes Let’s Encrypt SSL free.
How to verify: Visit your site. Look at the URL bar. You should see a lock icon and “https://”. If you see “Not Secure,” contact your host or platform support to enable SSL.
Favicon: The small icon that appears in browser tabs. Makes your site look professional. Upload a 512x512 pixel logo image as your favicon. Most platforms have a simple upload tool for this.
Error pages: Create a custom 404 page (for broken links). Include navigation and a search box so visitors don’t hit a dead end.
Forms that actually work: Test every contact form before launch. Submit a test message and verify it arrives in your inbox (not spam folder). Shockingly common failure point.
Browser compatibility: Test your site in Chrome, Safari, Firefox, and Edge. It should work in all of them. Most modern platforms handle this automatically, but verify.
☐ Site is mobile-responsive (tested on real phones)
☐ PageSpeed Insights score is 80+ (or close)
☐ All images compressed to under 500 KB
☐ SSL certificate installed (https:// with lock icon)
☐ Favicon uploaded and displays in browser tabs
☐ Contact forms tested and working
☐ Site tested in Chrome, Safari, Firefox, Edge
☐ Custom 404 error page created
Let’s build SEO into your site from day one - so you rank in Google and get free organic traffic.
The 3 things you must take away from this chapter
The single best way to traffic is to do basic SEO on your site - and then - PUBLISH as much content as you can on popular platforms like Medium, Pinterest, Quora, Instagram, TikTok, YouTube, LinkedIn, X.com, etc.
Unfortunately, SEO will not bring a lot of people to your website automatically. Many founders assume once site is live, the traffic starts. Not true. It's harder than ever to get free Google traffic unfortunately - there's so much competition. But in order to rank with Google at all - you should do all the basic SEO to give your site a chance!
Smart move: Build SEO in from day one. Then begin marketing using other methods like social media, guest blogging, etc. Retrofitting later means changing URLs (breaks links), rewriting titles, renaming images. That costs $1,000-$3,000 in consultant fees plus months of delay.
SEO (Search Engine Optimization) is making your website attractive to search engines so it ranks higher when people search for what you offer.
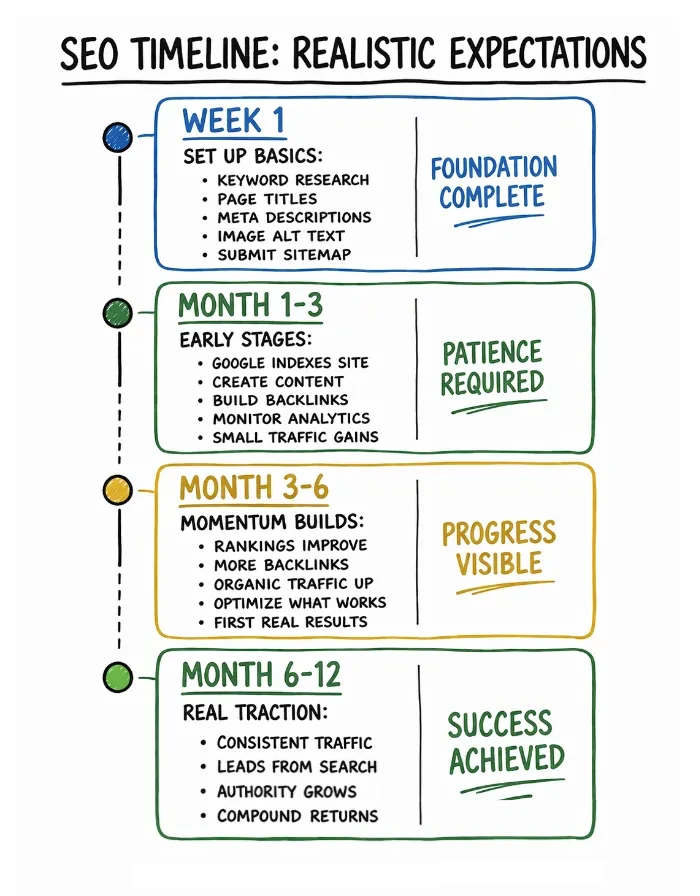
It takes 3-12 months to begin seeing SEO traffic results, but it’s free ongoing traffic.
1. Research keywords. What do customers type into Google to find businesses like yours? Use free tools like Google Keyword Planner or Ubersuggest. Find 5-10 primary keywords.
Example for Sarah: “meal prep delivery Denver,” “healthy meal delivery,” “organic meal prep,” “Denver meal service”
2. Use keywords strategically. Place your primary keyword in your page title, H1 headline, first paragraph, and URL. Use them naturally - don’t keyword-stuff. Google penalizes over-optimization.
3. Write compelling meta descriptions. The 150-160 character summary in Google search results. Make it clear and compelling - this is your ad copy. Include your keyword naturally.
4. Optimize images. Compress to under 500 KB. Use descriptive file names (“denver-meal-prep-chicken.jpg” not “IMG_1234.jpg”). Add alt text for search engines and screen readers.
5. Submit your sitemap to Google Search Console. This tells Google all your pages exist. Most platforms generate sitemaps automatically (WordPress, Squarespace, Shopify). Just submit it at search.google.com/search-console.
☐ Page title includes primary keyword (50-60 characters)
☐ H1 headline includes keyword naturally
☐ Meta description is compelling (150-160 chars)
☐ URL is clean and descriptive
☐ Images compressed, renamed descriptively, with alt text
☐ Sitemap submitted to Google Search Console
Sarah’s SEO Setup:
Keyword: “meal prep delivery Denver”
Title: “Meal Prep Delivery Denver | Organic, Chef-Prepared | Sarah’s Meal Prep Co.”
Meta: “Healthy meal prep delivery in Denver. 100% organic ingredients, customizable macros, delivered fresh twice weekly. Order now.”
Image: “denver-meal-prep-organic-chicken.jpg” with alt text “organic chicken meal prep container Denver”
Don’t assume the fast-talking SEO 'expert' will get you the traffic and results they promise. There are a ton of "I'll get you onto page 1 of Google" SEO 'experts' out there. Do your research, check their references heavily.
Don’t keyword-stuff. Repeating “Denver meal prep” 50 times looks spammy and Google will penalize you. Use keywords naturally.
Don’t buy backlinks. Shady SEO companies sell “1,000 backlinks for $99.” Google detects this and your rankings tank. Earn backlinks through great content.
Don’t ignore mobile optimization. Google uses mobile-first indexing. If your site doesn’t work on mobile, you won’t rank.
Don’t expect instant results. Anyone promising #1 rankings in 30 days is lying. SEO takes 3-12 months minimum.
If you’re a local business (like Sarah in Denver), local SEO is critical.
Set up Google Business Profile: Free listing that appears in Google Maps and local search results. Claim yours at google.com/business. Add photos, hours, services, and collect reviews.
Include city/region in your content: “Serving Denver and surrounding areas” helps Google understand your location.
Get reviews: Google reviews boost local rankings. Ask happy customers to leave reviews. Respond to all reviews (good and bad).
NAP consistency: Your Name, Address, and Phone number should be identical everywhere online (website, Google, Facebook, Yelp). Inconsistencies confuse Google.
The single best way to improve SEO: publish helpful content regularly.
Blog posts answering customer questions. How-to guides. Recipes (for Sarah). Industry insights.
Publish weekly or bi-weekly minimum. Google rewards fresh, useful content.
Each blog post is another page Google can index, another chance to rank for keywords, another opportunity for backlinks.
Let’s set up the features that actually do the work - capturing leads and processing sales.
The 3 things you must take away from this chapter
Your website can look beautiful. Your copy can be perfect. Your SEO can be dialed in.
But if your contact form doesn’t work or your checkout process breaks, you get zero results.
Let’s make sure the functional pieces actually function.
A contact form is the simplest way for customers to reach you. But only if it actually sends the message.
Minimum fields:
Phone number is optional. Every extra field you add reduces submissions by 10-20%. Keep it simple.
Where the form sends: Choose an email address you check daily. Responding within 24 hours is standard. Faster is better.
Testing is critical: Submit a test message from the live form before launch. Verify it arrives in your inbox (not spam folder). If it goes to spam, add the sending address to your contacts.
Auto-reply helps: Set up an automatic “We received your message and will respond within 24 hours” confirmation email. Reassures customers and reduces repeat submissions.
Common form tools:
If you’re selling products or services online, you need a way to accept payments.
Best platforms for ecommerce:
Shopify: Built for online stores. Easiest setup. Includes shopping cart, checkout, inventory, and payment processing. Integrates with Stripe, PayPal, Apple Pay, Google Pay. 2.9% + 30¢ per transaction.
WooCommerce (WordPress plugin): Free plugin, flexible, requires more setup. Install Stripe or PayPal plugins for payments. Same transaction fees. More control but steeper learning curve.
Square: Good for businesses that sell both online and in-person. One system for website and physical point-of-sale. 2.9% + 30¢ online, 2.6% + 10¢ in-person.
Every extra step in checkout increases abandonment. The average cart abandonment rate is 70%. Simplify to reduce it.
Best practices:
Before launch, complete a real test transaction.
Add a product to cart. Fill out shipping. Enter payment info (use a real card with a small amount like $1). Complete the order.
Verify:
If any step breaks, you’re losing sales. Fix it before going live.
Email signup forms: Collect emails for your newsletter. Use Mailchimp (free up to 500 contacts), ConvertKit, or your platform’s built-in tools. Offer an incentive: “10% off your first order” works.
Live chat: Helps answer questions instantly. Increases conversions if you can actually respond in real time. Useless if it goes unanswered. Tools: Intercom, Drift, Tidio.
Appointment scheduling: If you’re service-based, integrate Calendly or Acuity Scheduling. Let customers guide directly without email back-and-forth.
Customer accounts: For ecommerce, allow customers to save info, track orders, and view history. Shopify and WooCommerce include this.
☐ Contact form tested and working (messages arrive in inbox)
☐ Payment processing set up and tested (if ecommerce)
☐ Entire checkout flow completed successfully (desktop and mobile)
☐ Order confirmation emails send correctly
☐ Inventory management working (if applicable)
☐ Email signup form connected to email platform
☐ All forms are mobile-friendly
Let’s test rigorously and launch smoothly - because you only get one chance at a first impression.
The 3 things you must take away from this chapter
Don’t launch until you’ve tested everything.
You only get one chance at a first impression. Launch with broken forms or a site that doesn’t work on phones, and you lose trust forever.
Fixing issues BEFORE launch is 10 times easier than after.
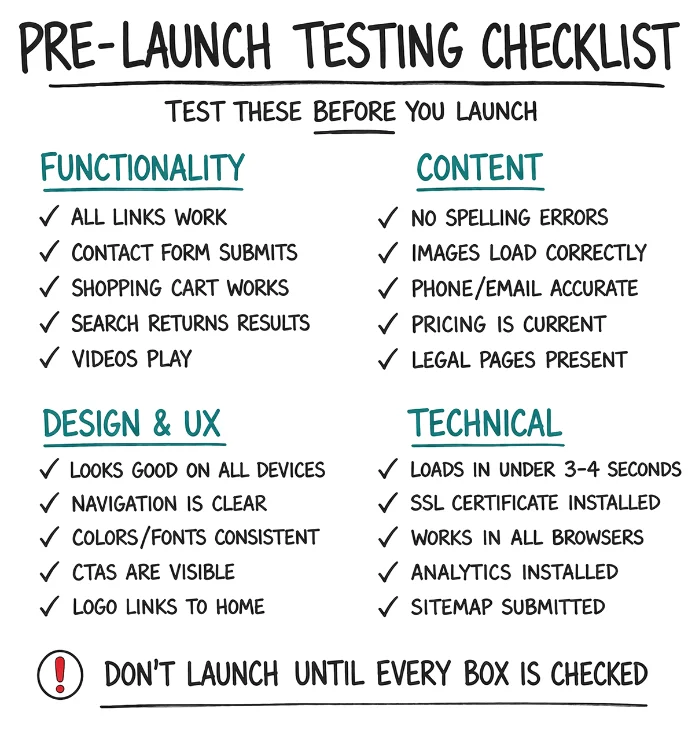
Functionality testing:
☐ All links work (internal and external)
☐ Test on major browsers: Safari, Chrome
☐ Contact form submits successfully and sends to correct email
☐ Shopping cart and checkout process work (if ecommerce)
☐ Search function returns relevant results
☐ Image galleries and sliders work smoothly
☐ Videos play properly
☐ PDF downloads work
Content testing:
☐ No spelling or grammar errors (proofread EVERY page)
☐ All images load and display correctly
☐ Phone numbers and email addresses are correct
☐ Business hours and address are accurate
☐ Pricing information is current and correct
☐ Legal pages (Privacy Policy, Terms) are present if needed
Design and UX testing:
☐ Site looks good on desktop, tablet, and phone
☐ Navigation makes sense and is easy to use
☐ Colors and fonts are consistent across all pages
☐ White space and spacing look intentional (not cramped)
☐ CTAs are visible and clearly labeled
☐ Logo links back to homepage (standard practice)
Technical testing:
☐ Site loads in under 3-4 seconds (test with Google PageSpeed Insights)
☐ SSL certificate is installed (shows “https://”)
☐ Site works in multiple browsers (Chrome, Safari, Firefox, Edge)
☐ No broken images or missing content
☐ Favicon (small icon in browser tab) is set
☐ Google Analytics tracking code is installed
☐ Sitemap is created and submitted to Google Search Console
Mobile-specific testing:
☐ Text is readable without zooming
☐ Buttons are large enough to tap with thumb
☐ Forms work smoothly on mobile keyboard
☐ Navigation menu (hamburger menu) works properly
☐ Images don’t overflow screen
Business-critical testing:
☐ Contact forms send to monitored email address
☐ Payment processing works (test with real small transaction)
☐ Order confirmation emails send correctly
☐ Customer account creation works (if applicable)
Ask 5-10 people to test. Target customers, not just friends. Give them specific tasks:
Watch them use the site. Don’t help. Where do they get confused? What do they click? What do they expect that isn’t there?
Ask three questions:
Their answers tell you exactly what needs to be fixed.
☐ All testing completed and issues fixed
☐ Google Analytics installed and verified it’s tracking
☐ Sitemap submitted to Google Search Console
☐ Backups verified and know how to restore
☐ SSL certificate active (https:// with lock)
☐ Social media profiles updated with website link
☐ Email signature updated with website link
☐ Business cards/marketing materials updated (if applicable)
☐ Have 48 hours of availability to fix any issues that arise
Don’t launch on Friday afternoon. If something breaks, you’re spending the weekend fixing it or waiting until Monday for support.
Launch on Tuesday or Wednesday morning. Gives you 2-3 business days to address any issues with full support availability.
Have the next 48 hours relatively clear. Monitor analytics, respond to contact forms quickly, and fix any issues that pop up.
Monitor Google Analytics daily for the first week. See where traffic is coming from, what pages people visit, how long they stay.
Respond to contact forms within 24 hours. Ideally within a few hours. Speed matters for conversions.
Fix any issues users report immediately. If someone says something isn’t working, believe them.
Promote the launch:
Let’s track the right metrics and make data-driven improvements - so your website gets better over time.
The 3 things you must take away from this chapter
Launching your website is not the end. It’s the beginning.
Your site needs ongoing attention. Track what’s working, fix what’s broken, and continuously improve.
Google Analytics shows you who visits your site, where they come from, what they do, and where they leave.
How to set it up:
Platforms make this easy: Squarespace, Wix, Shopify, and WordPress all have built-in Google Analytics integration. Just paste your tracking ID.
Don’t get lost in vanity metrics. Focus on these:
1. Traffic Sources: Where are visitors coming from? Google search, social media, direct URL, referrals? Double down on what’s working.
2. Conversion Rate: Percentage of visitors who complete your main goal (buy, contact, sign up). Industry average is 2-5%. If you’re below 1%, something’s broken.
3. Bounce Rate: Percentage of visitors who leave without clicking anything. High bounce rate (70%+) means your homepage isn’t clear or relevant.
4. Top Pages: Which pages get the most traffic? Which convert best? Improve your top performers and you amplify results.
5. Average Session Duration: How long do people stay? Under 30 seconds means they’re not finding what they need.
Goals track specific actions you want visitors to take.
Examples:
How to set up goals in GA: You may need help using some advanced features in Google Analytics. It's interface is confusing, unintuitive and tricky. Give it a try though: In Google Analytics, go to Admin → Goals → New Goal. Choose a template or custom goal, then define the action (URL visited, event triggered, duration, etc.)... or watch some YouTube videos to figure it out or get some pro help.
Goals show you what percentage of visitors are converting and where they’re dropping off.
Spend 15-30 minutes per week reviewing analytics:
Look for patterns. If a blog post is driving tons of traffic, write more like it. If a page has a 90% bounce rate, fix it.
Spend 30 minutes per month minimum on these tasks:
☐ Check that website is loading and functioning
☐ Update WordPress core, themes, and plugins (if WordPress)
☐ Check and fix any broken links
☐ Verify contact forms are working and receiving submissions
☐ Review Google Analytics for traffic patterns and issues
☐ Check site speed with PageSpeed Insights
☐ Verify SSL certificate is active
☐ Ensure backups happened successfully
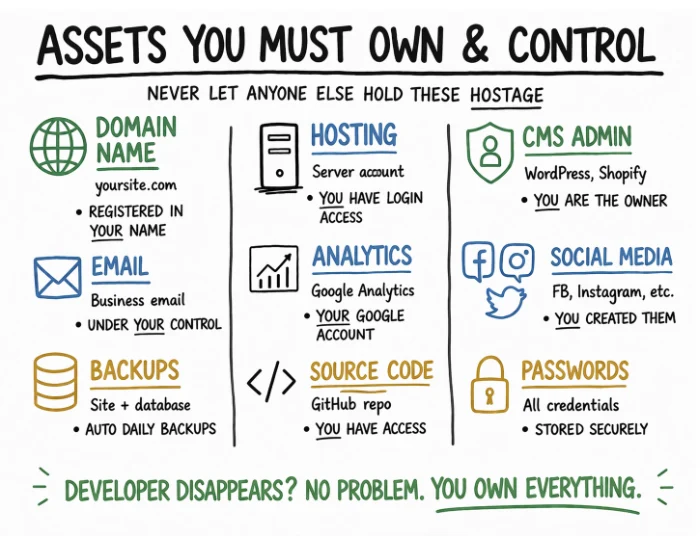
Never let anyone else control your website, domain, or accounts.
YOU must own:
Developers can have temporary access. But you’re the account owner. Always.
Horror story: developer registers domain in their name, relationship sours, they demand $5,000 to transfer it. Prevent this by owning everything from day one.
If bounce rate is high on homepage: Clarify your headline, simplify navigation, or make your CTA more prominent.
If conversion rate is low: Test different CTA copy, reduce form fields, add social proof, or improve page speed.
If a page gets lots of traffic but no conversions: Add a clear CTA, improve relevance, or guide visitors to a better conversion page.
If organic traffic is low: Publish more SEO-optimized content, improve meta descriptions, or earn backlinks.
Small tweaks compound over time. A 1% improvement per month = 12.7% better results in a year.
DIY maintenance if: You’re using a website builder (Wix, Squarespace, Shopify), comfortable with basic updates, and have 1-2 hours per month.
Hire help if: You’re running WordPress with many plugins, need regular content updates, don’t have time, or have complex custom functionality. Professional maintenance costs $50-$200/month typically.
Your website is never “done.” It evolves with your business.
Budget for quarterly improvements and updates. Add features as they become necessary. Refresh design every 2-3 years to stay current.
Stay informed about your platform’s new features. Platforms like WordPress, Shopify, and Squarespace add new capabilities regularly.
Keep learning from analytics and customer behavior. Your website is a living laboratory. Pay attention to what works.
You don’t need to be technical to have a website that works for your business.
You just need to understand what your customers need from you, how to communicate your value clearly, and the confidence to make smart decisions about platforms, design, and features.
That’s what this guide gave you.
You know what your website needs to accomplish. You chose the right platform. You understand domain and hosting. You know which pages to build and what to put on them.
You know how to write copy that converts. You understand when to hire help and how to protect yourself. You know the technical essentials that can’t be skipped.
You’re equipped to build, launch, and maintain a professional website that serves your business for years.
That puts you ahead of 90% of small business websites.
1. Define your website’s primary purpose. Build trust? Generate leads? Sell products? Be specific.
2. Choose your platform based on purpose, budget, and technical comfort.
3. Register your domain in YOUR name. Use GoDaddy, Namecheap, or Google Domains.
4. Write your core content: hero title, subtext, main value points.
5. Find 3-5 example websites you love to show designers (or guide your own template choice).
6. Build or hire. Follow the guidance in Chapters 6-7.
7. Test everything before launch. Chapter 10’s checklist is your guide.
8. Set up Google Analytics and monitor results. Chapter 11 shows you how.
Your website is a tool that works for your business around the clock. It builds trust with people you’ve never met. It generates leads while you sleep. It answers questions you don’t have time to answer personally.
It’s your always-on salesperson, your credibility builder, your customer service rep.
Now go build it. You’ve got this.
Good luck, and use it well.
— Tim
Tim Donahue is the founder of StartABusiness.Center, where he helps first-time founders turn business ideas into real, profitable businesses.
With over 270 practical articles covering everything from validating ideas to building websites to finding customers, StartABusiness.Center has become a trusted resource for non-technical entrepreneurs who want straight answers without the hype.
Tim Donahue has started 10 businesses — both online and brick-and-mortar — and sold half of them, generated millions in revenue, retired early, and now spends his time helping new business owners avoid expensive mistakes and build profitable companies faster. As a certified SCORE mentor, he’s guided over 1,000 founders through the messy early stages of starting a business.
Tim believes that starting a business shouldn’t require a technical background, an MBA, or venture capital. It requires clear thinking, practical advice, and the willingness to do the work.
This Quick Start Guide series distills the most critical lessons from StartABusiness.Center into actionable guides you can complete in a weekend.
Guide 1: How To Assess the Strength Of Your Business Idea - Before You Commit To It
Validate your business idea before spending thousands on a website. Learn how to test demand, talk to real customers, run the numbers, and decide whether to GO, PIVOT, or PARK IT.
Guide 2: How To Find Your First Customers - A Step-by-Step Marketing Guide for New Business Owners
Learn practical, proven strategies to attract your first paying customers without a big budget or marketing expertise.
StartABusiness.Center Blog
260+ free articles on:
Visit: StartABusiness.Center
Tim Donahue is the founder of StartABusiness.Center, where he helps first-time founders turn ideas into real businesses without wasting years on the wrong approach.
After years of mentoring hundreds of new founders, Tim noticed a pattern: most struggle not because they lack drive, but because they skip critical foundational steps. They launch without proper validation, build websites that don't convert, guess at marketing—then wonder why growth feels impossible.
This guide series was created to give new founders a clear, step-by-step path through every stage of starting a business: from assessing ideas and validating with customers, to setting up legal and financial foundations, building effective websites, finding customers, and scaling sustainably.
Tim's approach: No fluff. No motivational speeches. Just practical frameworks that work in the real world.
© 2025 StartABusiness.Center | All Rights Reserved