
A practical guide to business structures, legal requirements, pricing, funding, and financial foundations
Let’s get this out of the way: the legal and financial side of starting a business feels intimidating. You’ve got lawyers using words like “fiduciary” and accountants throwing around terms like “pass-through taxation.” It all sounds expensive, complicated, and like something you’re supposed to already know.
Here’s the truth: you don’t need to be an expert. But you do need to know enough to make smart decisions, protect yourself, and avoid expensive mistakes.
If you pick the wrong business structure, you could end up paying thousands more in taxes than you need to - or exposing your personal assets. If you don’t get the right permits, you could be shut down or fined. If you screw up your partnership agreement, you could lose your business — and your friendship.
The good news? Most of this isn’t as complicated as it sounds. You just need someone to explain it in plain English.
That’s what this guide does.
This guide walks you through the nine most important legal and financial decisions you’ll face as a new founder:
Throughout this guide, we’ll follow the story of Sarah, who’s starting a small-batch coffee roastery called Common Grounds. She plans to sell roasted beans online and through local cafes. She has $15,000 saved, a garage workshop, and one business partner who handles sales.
We’ll use Sarah’s coffee business to show how these concepts apply in the real world — from choosing her business structure to pricing her beans to splitting equity with her partner.
Read it straight through, or jump to the chapter that matches your current question. Fill in the exercises. Run the numbers. By the end, you’ll have a clear plan for the legal and financial foundation of your business.
Let’s get started.
Let’s figure out the right timing — so you don’t waste money incorporating before you’re ready.
The 3 things you must take away from this chapter
Here’s one of the most common mistakes new founders make: incorporating too early.
They get excited about an idea. They want to feel like they’re making progress. So they spend $200–$500 to file an LLC, register a domain, maybe even get business cards printed. They tell themselves they’re “making it official.”
But here’s the problem: incorporating before you’ve validated your idea is expensive procrastination. You’re spending time and money on paperwork instead of talking to customers, testing demand, or building your first version.
When you form an LLC or corporation, you’re taking on cost and complexity:
If you incorporate on Day 1 and then discover three months later that nobody wants your product, you’ve wasted money and created obligations you now have to unwind.
Worse yet: Incorporating can give you a false sense of progress. It feels productive. You’ve got official paperwork! But it doesn’t get you closer to revenue or customers. It’s busywork that delays the hard, necessary work of validation.
Don't let the busywork like setting up your accounts, business structure, business cards, DBAs, social media set up, renting office space etc. pull you off task - the real job is creating a product, testing it in to see if the business has potential.
Afterward you can do all the other stuff!
Here’s the smarter approach:
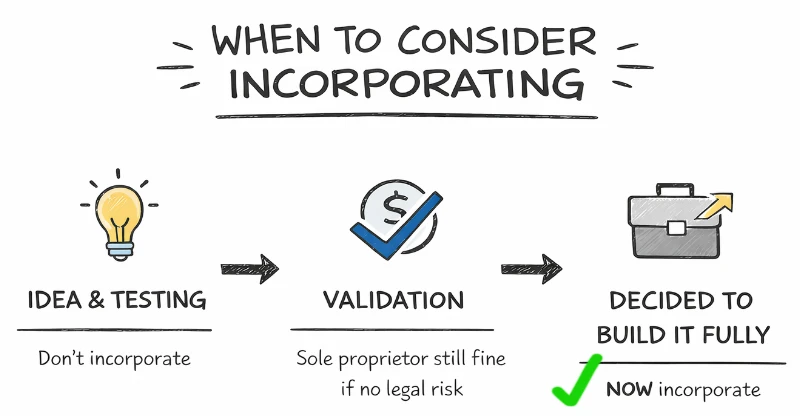
Stage 1: Idea & Testing
You have an idea. You’re running experiments, talking to potential customers, maybe building a simple landing page or prototype. Don’t incorporate yet. You can do all of this as an individual.
Stage 2: Validation
You’ve confirmed that people want this. Maybe you’ve made a few test sales, gotten pre-orders, or signed your first client. You’re operating as a sole proprietor under your own name. You report any income on your personal tax return. Simple. Still no need to incorporate.
Caveat: If you feel there's a risk of you getting sued during your MVP and testing phase, consider formalizing your LLC or S-Corp to protect your personal assets BEFORE involving the public.
Stage 3: Commitment & Growth
You’re ready to go all-in. You’ve validated demand. You have customers (or clear evidence they’re coming). You’re planning to scale, hire people, or invest significant money. Now you incorporate. You form an LLC or choose a corporate structure. You separate your business finances from your personal finances. You get proper liability protection.
This is the natural progression. Don’t skip straight to Stage 3 when you’re still in Stage 1.
You don’t need an LLC to start testing your idea. Here’s what you can do as an individual (sole proprietor):
The only limitation: if you want to use a business name that’s different from your own legal name, you’ll need to file a DBA (Doing Business As) with your county or state. This costs $10–$100 and takes 10 minutes. It’s not the same as forming an LLC — it just lets you operate under a trade name.
Don’t incorporate if:
If any of these apply, wait. Keep testing. Work as a sole proprietor. Don’t add complexity until you need it.
You should incorporate when:
These are clear signals that your business has moved beyond the testing phase. Now formalization makes sense.
Here’s a simple 30-day validation process you can run without incorporating:
Week 1: Talk to 10–15 people who fit your target customer profile. Ask about their problems, what they’ve tried, and what they’d pay for a solution.
Week 2: Build a simple landing page describing your offer. Include a price. Add a “Pre-order” or “Get early access” button. Drive 100–200 people to it (Facebook ads, Reddit, your network).
Week 3: If people are signing up or paying, create a minimal version of your product or service. Deliver it to 3–5 customers manually.
Week 4: Collect feedback. Adjust pricing. Decide: is there enough demand to commit? If yes, now you incorporate. If no, you just saved yourself $500+ and months of wasted effort.
Answer these questions honestly:
1. Have you validated demand? (Pre-orders, paying customers, or strong proof people want this?)
2. Are you committed to working on this for at least the next year?
3. Do you need liability protection or plan to bring on partners/employees soon?
4. Are you generating revenue (or about to)?
If you answered yes to at least two of these, it’s time to formalize. If not, keep testing as a sole proprietor.
Absolutely! This is very common. Whenever you've outgrown your Sole Prop, simply go ahead and file paperwork to set up your LLC or S-Corp. This is done all the time and very common.
Month 1–2: Sarah starts roasting coffee in her garage. She sells bags to friends and at a local farmers market under the name “Sarah’s Coffee.” She operates as a sole proprietor. No LLC. No formal business structure. She tracks her costs and revenue in a simple spreadsheet.
Month 3: She’s sold 200 bags. Three local cafes want to carry her coffee. She realizes this is real — people are paying, and demand is growing. She brings on a business partner (Mike) to handle sales.
Month 4: Sarah and Mike form an LLC called Common Grounds Coffee Roasters. They file with the state ($200), set up a business bank account, and draft a simple operating agreement. This is the right time. They’ve validated the idea, they’re committed, they have a partner, and they need liability protection.
Why this timing works: Sarah didn’t waste money incorporating before she knew the idea had legs. She tested first. Once she had proof, then she formalized.
Don’t let forming an LLC become a way to avoid the hard work of validation. Incorporating doesn’t make your business real. Customers do.
Test your idea first. Talk to people. Make a few sales. Get proof. Then formalize your business structure. You’ll save money, avoid unnecessary complexity, and you’ll only incorporate ideas that actually have a future.
Let’s pick the legal structure that saves you taxes, limits your liability, and doesn’t create unnecessary paperwork.
The 3 things you must take away from this chapter
One of the first decisions you’ll make is choosing your business structure. This isn’t just a formality. It determines how much you’ll pay in taxes, whether your personal assets are at risk if something goes wrong, and how complicated your annual filings will be.
The good news? For most small businesses, this decision is simpler than it sounds.
Here are the structures you’ll hear about most often:
Sole Proprietorship: The simplest option. You and the business are legally the same entity. No registration required (unless you use a business name). You report income on your personal tax return.
LLC (Limited Liability Company): A step up in protection. You file paperwork with your state to create the LLC. It shields your personal assets from business debts and lawsuits. Taxes still “pass through” to your personal return (unless you elect otherwise).
S-Corp: A tax designation (not a separate structure). You can elect S-Corp status if you’re an LLC or C-Corp. The benefit? You can pay yourself a salary and take distributions, potentially reducing self-employment taxes.
C-Corp: The structure used by big companies planning to raise venture capital or go public. It’s taxed separately from you (which can lead to double taxation). Most small businesses don’t need this.
Here’s how to think about it:
For most people, an LLC is the sweet spot. It gives you liability protection without the complexity of a corporation. It costs $50–$500 to file (depending on your state) and requires minimal annual paperwork.
If your business is making decent money (let’s say $60,000+ annually), you might benefit from electing S-Corp tax treatment. Here’s why:
As a sole proprietor or LLC, you pay self-employment tax (15.3%) on all your net income. With an S-Corp, you pay yourself a “reasonable salary” (subject to payroll taxes) and take the rest as distributions (not subject to self-employment tax).
Example: You make $80,000 in profit. As an LLC, you pay 15.3% self-employment tax on the full $80K = $12,240. As an S-Corp, you pay yourself a $50K salary (payroll taxes = $7,650) and take $30K as distributions (no extra tax). You save about $4,590.
The catch? You’ll need to run payroll and file additional forms. It’s usually worth it once you’re making solid money, but not necessary on Day 1.
Here’s what you get with each structure:
Sarah’s situation: She’s starting a coffee roastery with one business partner. They’ll be selling products (beans) to cafes and online customers. They have a small budget and want liability protection.
Her choice: Form an LLC. It protects their personal assets if a customer gets sick or they face a lawsuit. It’s simple to set up and doesn’t require complex tax filings. Cost: $200 filing fee in her state.
What she’ll revisit later: Once the business is profitable (around $60K+/year), she’ll consider electing S-Corp status to save on self-employment taxes.
1. What’s your liability risk? (customers, employees, products, services)
2. How much paperwork can you handle? (minimal, moderate, complex)
3. Do you have partners? (yes/no)
4. What’s your projected annual profit? (under $30K, $30K–$60K, $60K+)
5. Based on the above, which structure makes sense?

Let’s figure out which permits you need so you don’t get shut down or fined three months in.
The 3 things you must take away from this chapter
Licenses and permits sound boring. They also sound confusing. But here’s the reality: if you don’t get the right ones, your city or state can fine you, shut you down, or both.
The good news? For most businesses, this is simpler than you think. It’s not fun, but it’s manageable.
One of the most confusing things for new founders is what order to do everything in. You can’t open a business bank account without an EIN. You can’t get an EIN without forming your LLC. And you can’t form your LLC without choosing a name first.
Here’s the exact sequence:
Common mistakes founders make:
Do it in order. It’ll save you time, money, and frustration.
1. Business License (General Operating License)
This is the baseline. Nearly every business needs this. It’s issued by your city or county and gives you permission to operate within their jurisdiction. Cost: usually $50–$400/year depending on location and revenue.
2. Professional or Trade Licenses
If you’re in a regulated profession — contractor, electrician, plumber, real estate agent, cosmetologist — you need a state-issued license proving you’re qualified. These often require exams or certifications.
3. Industry-Specific Permits
Certain industries have extra requirements:
4. Federal Permits (Rare for Most Small Businesses)
Most small businesses don’t need federal permits. But if you’re doing any of these, you do:
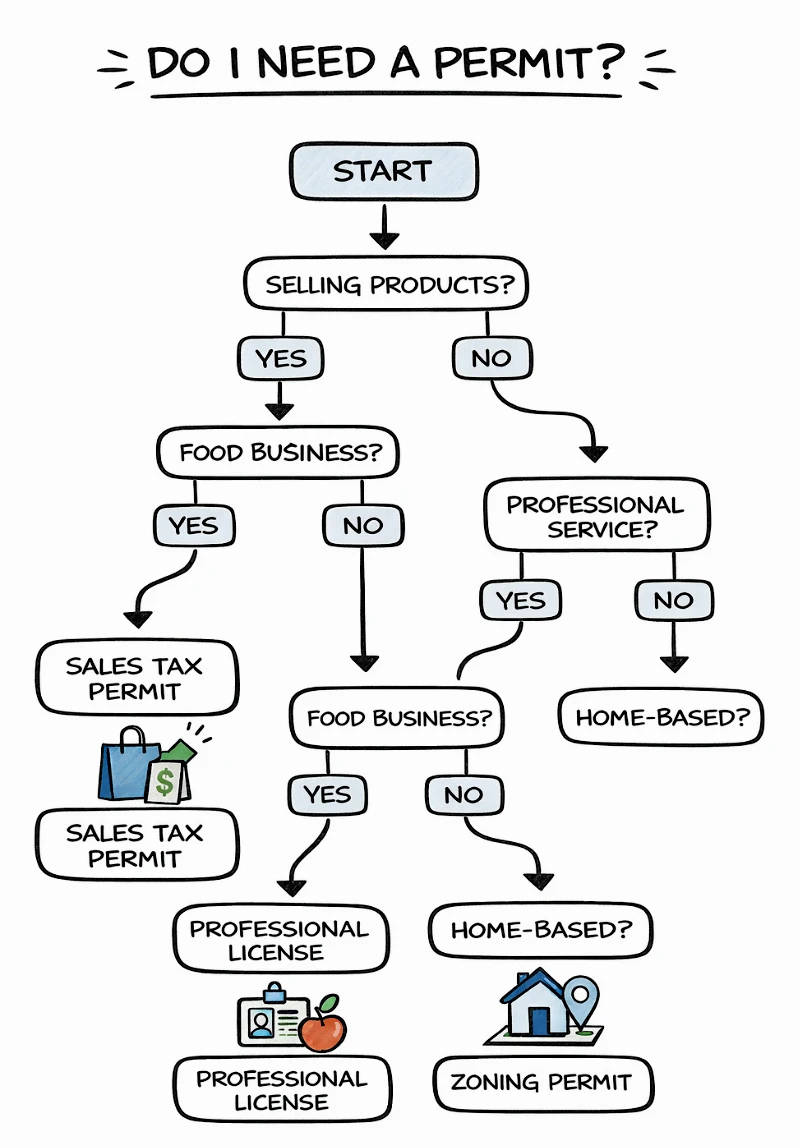
Don’t guess. Here’s the process:
Step 1: Check your city or county requirements.
Go to your city’s official website and search for “business license” or “start a business.” Most cities have a clear page that lists requirements. If not, call the city clerk or business licensing office.
Step 2: Check your state requirements.
Visit your state’s small business website (usually something like business.yourstate.gov). Look for industry-specific licenses, professional licenses, and sales tax permits.
Step 3: Ask your industry peers.
Find someone doing what you’re doing and ask them what licenses they needed. Join a local business group or online forum for your industry.
Step 4: Consult with a lawyer (if your business is complex).
If you’re in food, health, construction, or any highly regulated field, a one-hour consultation with a business attorney can save you thousands in fines and headaches.
If you’re selling physical goods (or certain services), you need a sales tax permit (also called a seller’s permit or resale certificate). This allows you to:
You register with your state’s Department of Revenue or Tax Board. It’s usually free. You’ll file sales tax reports monthly, quarterly, or annually depending on your revenue.
Important: If you sell online to customers in multiple states, you may need to register and collect sales tax in those states too. Start with your home state and worry about others once you’re making consistent sales.
Most states require you to open a Sales Tax Acct online, and make quarterly payments of the sales tax you collected. They want their tax! You'll enter your sales revenue and it will tell you what sales tax you should pay.
Let’s be real: some people operate without permits and get away with it for a while. But here’s what can happen:
Just get the permits. It’s not that expensive or complicated, and it protects you.
What Sarah needs:
1. Business license: From her city ($150/year)
2. Health department permit: Because she’s processing food (coffee beans). Requires an inspection of her roasting facility ($250 initial fee, annual renewals)
3. Sales tax permit: Because she’s selling products (free to register with the state)
4. Home occupation permit: Because she’s roasting coffee in her garage (zoning approval from the city, $75)
5. Food handler’s card: Required in her state for anyone handling food ($20, takes an online course)
Total cost: Around $500 to get fully legal, plus annual renewals
1. What city/county do you operate in?
2. Are you selling products or services?
3. Is your industry regulated? (food, health, construction, finance, etc.)
4. Are you working from home?
5. Based on the above, list the permits you likely need:
Let’s make sure no one can steal your name, logo, or original work — and that you don’t accidentally steal someone else’s.
The 4 things you must take away from this chapter
Your business name. Your logo. Your original content. These things are intellectual property (IP), and they have real value. Someone could copy them, confuse your customers, or even sue you if you accidentally use something that’s already protected.
Here’s what you need to know to protect yourself.
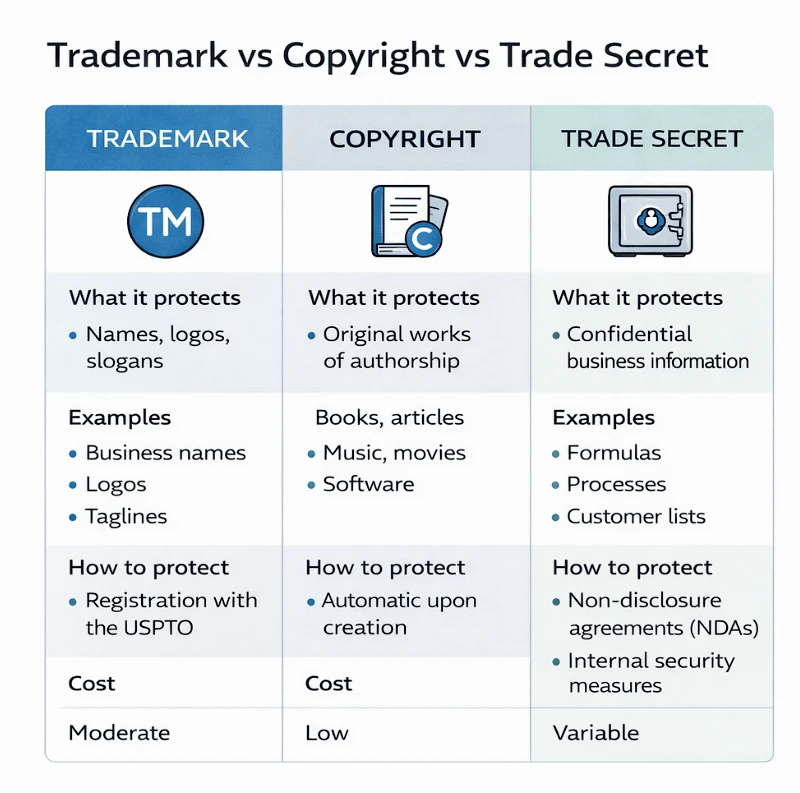
1. Trademarks (Protect Your Brand)
A trademark is anything that identifies your business: your name, logo, slogan, or even a specific color or sound. Think Nike’s swoosh, McDonald’s golden arches, or Apple’s bitten apple.
You get some automatic protection just by using your name in commerce. But to get strong protection — nationwide rights and the ability to sue infringers — you need to register your trademark with the U.S. Patent and Trademark Office (USPTO).
2. Copyrights (Protect Your Creative Work)
Copyright protects original works of authorship: books, blog posts, photos, graphics, music, videos, software code. The moment you create something original and “fix it in a tangible form” (write it down, record it, save the file), you automatically own the copyright.
You don’t have to register it. But registering your copyright with the U.S. Copyright Office gives you stronger legal standing if someone steals your work.
3. Trade Secrets (Protect Confidential Information)
A trade secret is any confidential business information that gives you a competitive edge: recipes, formulas, customer lists, manufacturing processes, pricing strategies. Coca-Cola’s recipe is a famous example.
You protect trade secrets by keeping them secret. Use non-disclosure agreements (NDAs) with employees, contractors, and partners. Don’t post them on the internet.
4. Patents (Protect Inventions and Innovations)
A patent gives you the exclusive right to make, use, and sell an invention for a limited time (usually 20 years from filing date). Patents protect functional innovations—new products, processes, machines, or improvements to existing technologies.
Unlike trademarks and copyrights, patents are expensive and complex. They require detailed technical documentation, legal expertise, and significant upfront investment. Most small businesses don't need patents—but some do.
There are three main types of patents:
1. Utility Patents (Most Common)
Protect how something works or what it does. Examples: a new type of door hinge, a software algorithm, a manufacturing process, a chemical formula, a medical device.
Requirements: Your invention must be:
2. Design Patents
Protect the ornamental design or appearance of a product—not how it works, but how it looks. Examples: the shape of a Coca-Cola bottle, the design of an iPhone, a unique furniture design.
Design patents are cheaper and faster than utility patents, but they only protect the specific visual design—not the underlying function.
3. Plant Patents
Protect new varieties of asexually reproduced plants (like a new rose hybrid). Most small businesses never encounter these.
You cannot patent:
Here's the reality: most small businesses do not need patents.
Patents make sense if:
Patents don't make sense if:
Patents are expensive. Here's what to expect:
Utility Patent Costs:
Design Patent Costs:
Total Investment: Plan for $10,000–$20,000 minimum for a utility patent, including all fees and attorney costs.
If you're not ready to commit to a full patent, you can file a provisional patent application:
A provisional patent is a good way to protect your idea while you figure out if it's worth the full investment.
Sometimes a trade secret is better than a patent. Here's why:
Choose a Patent If:
Choose a Trade Secret If:
Example: Google's search algorithm is a trade secret, not a patent. Why? Because a patent would require disclosing exactly how it works—and trade secret protection lasts forever, not just 20 years.
Ask yourself these questions:
1. Have you invented something truly novel and non-obvious?
(Not just an incremental improvement, but a real innovation)
2. Can competitors easily copy it once they see your product?
(If yes, a patent makes more sense than a trade secret)
3. Is there significant commercial potential?
(Will this generate enough revenue to justify $10K–$20K+ in costs?)
4. Are you in a competitive industry where patents matter?
(Tech, manufacturing, biotech, medical devices—patents are common. Service businesses—not so much.)
5. Can you afford to enforce the patent if someone infringes?
(Patent litigation costs $100K–$500K+. Be honest about your budget.)
If you answered YES to all 5: Talk to a patent attorney. You might need one.
If you answered NO to 2 or more: Skip the patent. Protect your idea through trade secrets, speed to market, or building a strong brand instead.
If a patent isn't right for you, here's how to protect your competitive advantage:
Most successful small businesses win through execution, customer service, and branding—not patents.
Here’s the reality: most small businesses don’t register a trademark right away — and that’s fine. It costs $250–$350 per “class” of goods/services to file, and the process takes 6–12 months.
But you should do this before you launch:
Step 1: Search for conflicts.
Go to the USPTO’s trademark database (tmsearch.uspto.gov) and search for your business name. Also Google it and check your state’s business name registry. Make sure no one else is already using it in your industry.
Step 2: Register your domain name and social handles.
Even if you don’t file a trademark, lock down yourbusinessname.com and your Instagram/Facebook/TikTok handles. It’s cheap insurance.
Step 3: Consider filing a trademark if:
You can file a trademark yourself (using the USPTO’s online system), or hire a trademark attorney ($1,000–$2,000 for a simple filing).
Again, copyright is automatic. The moment you write a blog post or design a logo, you own it. You can put a © symbol on it to signal that it’s protected.
You only need to register your copyright (with copyright.gov) if:
Cost: $65 per work. Most small businesses don’t bother unless they’re publishing books, creating software, or producing high-value creative content.
“Fair use” lets you use copyrighted material without permission in certain cases: criticism, commentary, news reporting, teaching, research. The classic example is quoting a guide in a review.
But here’s the catch: fair use is a legal defense, not a rule. If you get sued, a judge decides if your use was fair. That’s expensive and risky.
Safe rule of thumb: Don’t use other people’s photos, graphics, music, or text in your business without permission or a license. Use stock photo sites (like Unsplash or Pexels for free images), buy licenses, or create your own.
Patents Aren't Worth Much Unless You're Willing To Enforce Them
This is the hard part people don't understand: You have to be willing to go to court to enforce your patent, or it has very little power or meaning.
This typically means having your attorney send cease and desist letters and then taking the offender to court if they are uncooperative. Costs can run from $10,000-$150,000.
Here’s the hard truth: having a trademark or copyright doesn’t automatically stop people from stealing your stuff. You have to enforce it. That means:
Most small businesses handle small infringements with a polite email or a cease-and-desist letter. Save the lawsuits for serious, profitable violations.
What Sarah does:
1. Trademark search: Before launching, she searches USPTO and Google for “Common Grounds” to make sure no one else is using it for coffee products. She finds a few local cafes with similar names, but none with a federal trademark. She’s clear.
2. Register the domain: She buys commongroundscoffee.com and locks down @commongroundscoffee on Instagram.
3. Decide on trademark filing: She plans to file a federal trademark once the business is profitable ($350 filing fee). For now, she uses the ™ symbol (which signals she’s claiming the mark, even without registration).
4. Protect her recipes: Her unique roasting process is a trade secret. She doesn’t write it down anywhere public, and she has her partner sign a simple NDA.
5. Copyright: Her website copy and product photos are automatically copyrighted. She adds a © symbol to the footer of her site.
1. What’s your business name?
2. Have you searched USPTO and Google to make sure it’s available?
3. Have you registered your domain name and social media handles?
4. Do you have any trade secrets or confidential info that needs protection?
5. Will you file a trademark now, or wait until you’re profitable?
Let’s figure out what to charge so you make money, attract customers, and don’t undersell yourself.
The 3 things you must take away from this chapter
Pricing is one of the most stressful decisions you’ll make. Too high, and you scare people off. Too low, and you work yourself to exhaustion for pennies. Most new founders price too low because they’re afraid no one will buy.
Here’s how to think about it differently.
New founders tend to think like this: “I spent 10 hours making this, so I’ll charge $20/hour = $200.” That’s cost-based pricing, and it usually leaves money on the table.
Here’s a better way: value-based pricing.
What is the result worth to your customer?
Example: A freelance web designer builds a website in 15 hours. She could charge $1,500 (15 hours × $100/hour). But the website will bring the client $50,000 in new revenue over the next year. What’s that worth to the client? Maybe $5,000. Or $10,000. The 15 hours is irrelevant — the value is what matters.
The question isn’t “What did this cost me?” It’s “What is this worth to them?”
1. Cost-Plus Pricing (Good for products)
Add up your costs, then add a markup. Simple and safe.
Formula: Cost + Markup = Price
Example: You make a candle. Wax, wick, jar, labor = $8. You want a 50% margin. Price = $16.
2. Competitive Pricing (Good when you’re entering a crowded market)
See what your competitors charge and price around that range. You can go slightly lower (if you’re the budget option) or slightly higher (if you’re the premium option).
3. Value-Based Pricing (Best for services and high-value products)
Charge based on the result you deliver, not the time you spend. This is how consultants, designers, and coaches should think.
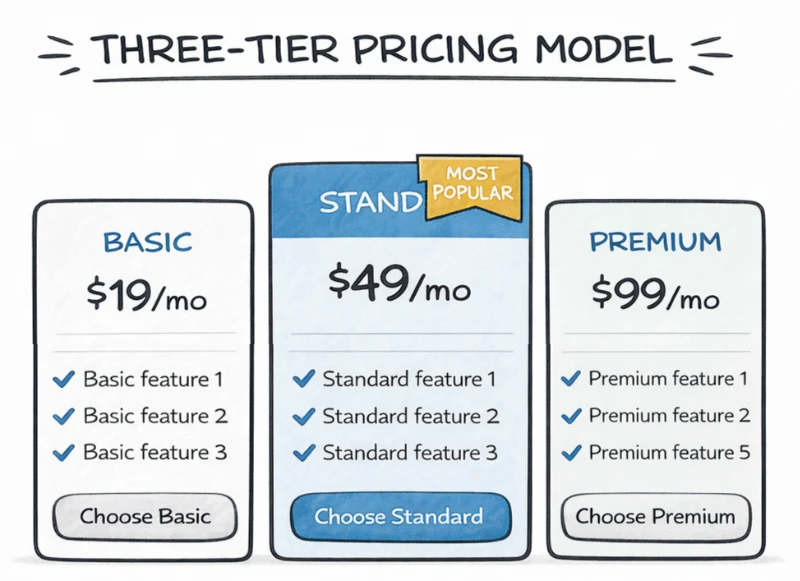
If you’re selling a service, software, or membership, offer three pricing tiers:
Why does this work? It gives customers choice (people like having options) and it anchors the middle option as the “best value.”
Example: A graphic designer
Being the cheapest is a dangerous game. You attract price shoppers (who leave the moment someone cheaper shows up), you make razor-thin margins, and you work more for less.
Instead, compete on value:
People will pay more if they believe they’re getting more.
Don’t overthink it. Pick a price, launch, and adjust based on what you learn. Here’s how:
Step 1: Start with a hypothesis.
Use cost-plus or competitive pricing to ballpark a number.
Step 2: Test it with 10–20 customers.
If people buy without hesitation, you might be too low. If everyone balks, you might be too high.
Step 3: Ask for feedback.
“Was this a fair price for what you got?” Listen to what they say.
Step 4: Adjust and test again.
Raise your prices by 10–20% and see what happens. You’d be surprised how often people don’t flinch.
Sarah’s product: 12 oz bag of small-batch roasted coffee
Her costs per bag:
Competitive research: Similar small-batch roasters charge $15–$22 per 12 oz bag.
Her price: $18/bag (wholesale to cafes at $12/bag)
Her margin: $18 − $8 = $10 profit per bag (56% margin)
Why this works: She’s in the middle of the market range, her quality justifies it, and her margin is healthy enough to cover marketing and overhead.
1. What are you selling?
2. What does it cost you to produce? (materials + labor + overhead)
3. What do competitors charge for something similar?
4. What’s the value to your customer? What result do they get?
5. Based on the above, what’s your starting price?
Let’s set up a simple system so you don’t get blindsided by the IRS or lose money you could’ve written off.
The 3 things you must take away from this chapter
Taxes and accounting scare new founders more than almost anything else. Good news: you don’t need to be an accountant. You just need a simple system to track income and expenses so you can file your taxes and not get audited.
This is your Business Accounting Crash Course in 10 seconds:
Here’s the minimum you need to do:
Do not run your business through your personal bank account. The IRS hates this. So do auditors. And it makes bookkeeping a nightmare.
Open a business checking account at your bank. You’ll need:
Cost: Many banks offer free business checking for small businesses. Shop around.
You need software to track income, expenses, and taxes. Don’t use Excel. Don’t use a shoebox of receipts. Use real accounting software.
Best options for small businesses:
Pick one and connect it to your business bank account. It’ll automatically pull in transactions, and you just categorize them.
Every business expense is potentially tax-deductible. That means you can subtract it from your income, lowering your taxable profit. But the IRS requires proof. That means receipts.
What counts as a business expense?
Save your receipts. Take a photo with your phone and upload it to your accounting software. Do this every week, not once a year.
If you’re self-employed (sole prop, LLC taxed as a sole prop, or partnership), you pay self-employment tax. This covers Social Security and Medicare. It’s 15.3% of your net profit.
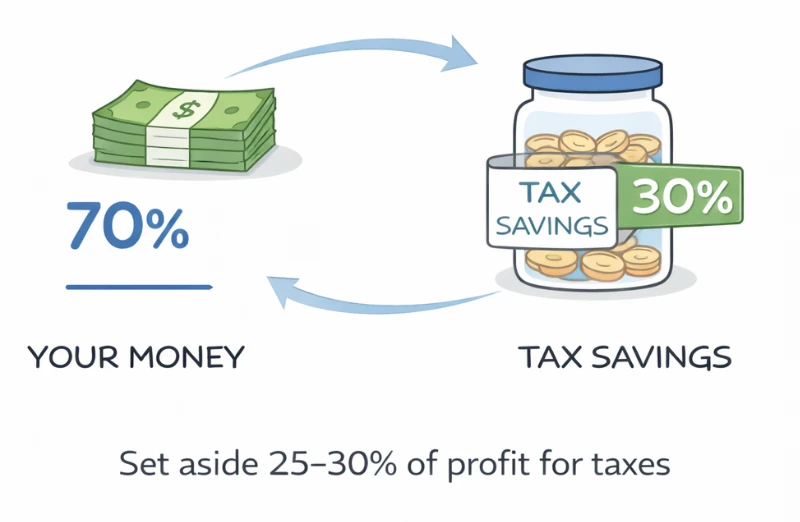
Example: You make $50,000 in revenue. Your expenses are $20,000. Your net profit is $30,000. Your self-employment tax = $30,000 × 15.3% = $4,590. Plus your regular income tax (which depends on your tax bracket).
This is why you need to set aside 25–30% of your profit for taxes. Open a separate savings account and transfer money there every time you get paid.
Here are the deductions that save small businesses the most money:
Home office deduction: If you use part of your home exclusively for business, you can deduct a portion of your rent/mortgage, utilities, and internet. Simplified method: $5 per square foot, up to 300 sq ft.
Vehicle mileage: Track business miles and deduct at the IRS standard rate (67 cents/mile in 2024). Use an app like MileIQ or just a mileage log.
Health insurance: If you’re self-employed, you can deduct 100% of your health insurance premiums.
Retirement contributions: Contribute to a SEP IRA or Solo 401(k). It’s tax-deductible and helps you save for the future.
Startup costs: You can deduct up to $5,000 in startup costs (business formation, legal fees, market research) in your first year.
Unlike employees, you don’t have taxes withheld from a paycheck. So the IRS expects you to pay taxes quarterly (April, June, September, January).
If you don’t pay quarterly, you’ll owe penalties and interest. Use IRS Form 1040-ES to calculate and pay online at irs.gov/payments.
Most accounting software will estimate your quarterly payments for you.
You can file your own taxes using software (TurboTax, H&R Block). But if your business is even moderately complex, hire a CPA for the first year. They’ll make sure you’re taking all the right deductions and not making mistakes.
Cost: $500–$2,000 for a small business tax return. It’s worth it.
What Sarah does:
1. Opens a business checking account at her local credit union (free for small businesses)
2. Signs up for Wave (free accounting software) and connects her bank account
3. Tracks expenses: She snaps photos of receipts and uploads them to Wave every Friday. Categories: supplies, packaging, marketing, gas (for deliveries).
4. Sets aside 30% for taxes: Every time she gets paid, she transfers 30% into a separate savings account labeled “Taxes.”
5. Hires a CPA: For her first tax return, she pays a CPA $600 to file. The CPA saves her $2,000 in deductions she didn’t know about.
☐ Open a business checking account
☐ Choose and set up accounting software (QuickBooks, Wave, FreshBooks)
☐ Connect your bank account to the software
☐ Create a separate savings account for taxes
☐ Set a weekly reminder to log expenses and snap receipt photos
☐ Research local CPAs and get quotes for tax prep
Let’s explore your funding options — from bootstrapping to investors — and figure out which one makes sense for you.
The 3 things you must take away from this chapter
Everyone wants to know: “How do I get money to start my business?” The answer depends on how much you need, what you’re willing to give up, and how fast you need to grow.
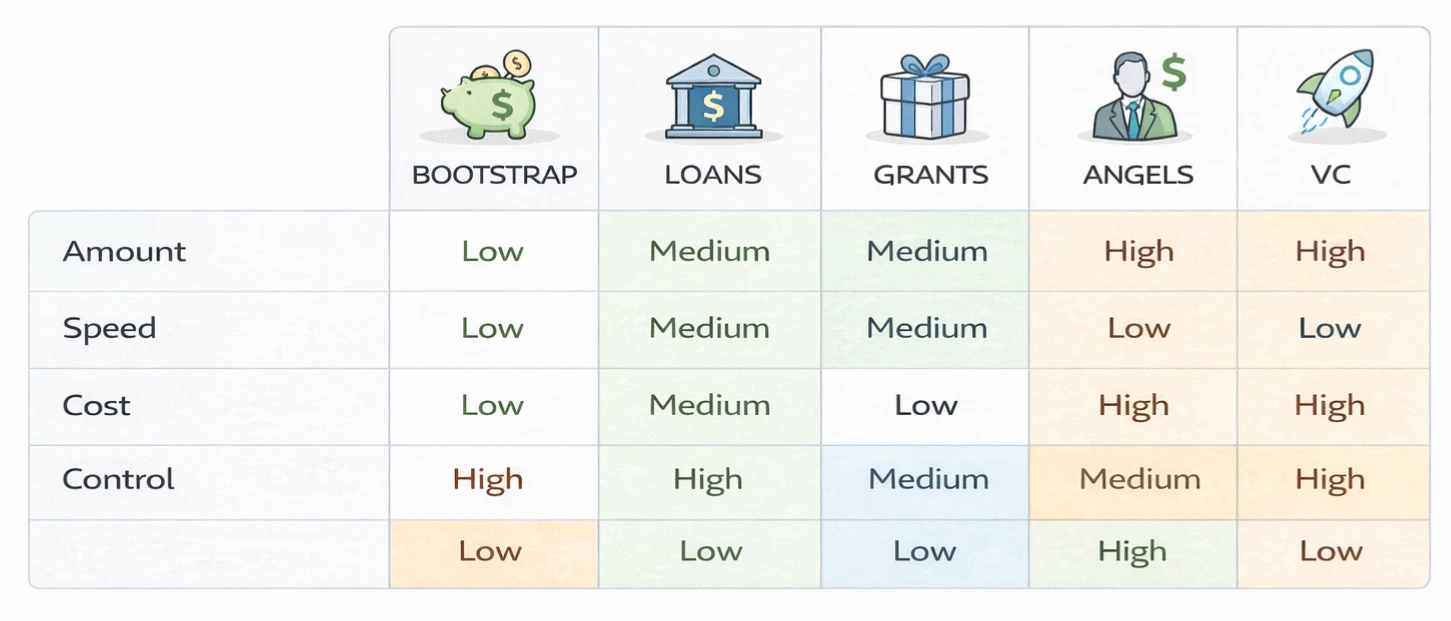
Here are your options, from cheapest to most expensive.
What it is: You fund the business yourself using personal savings, income from a day job, or profits from early sales.
Pros:
Cons:
Best for: Service businesses, side hustles, low-overhead businesses
What it is: You borrow money from people you know. Could be a loan or an investment (they get equity).
Pros:
Cons:
Best for: Small amounts ($5K–$50K), when you have supportive family/friends who can afford to lose it
What it is: You borrow money from a bank or credit union and pay it back with interest. SBA loans are government-backed, which makes them easier to get.
Pros:
Cons:
Best for: Established businesses with some revenue, or businesses that need equipment/inventory upfront
Warning: I don’t recommend loans for first-time founders. Too many businesses fail in the first two years, and you don’t want to be stuck with a $50K loan and no business.
What it is: Free money you don’t have to pay back. Offered by government agencies, non-profits, and some corporations.
Pros:
Cons:
Where to look: Grants.gov (federal grants), your state’s small business office, SBIR/STTR grants (for tech/research companies)
Best for: Specific industries (women-owned, minority-owned, tech startups, non-profits)
What it is: You raise money from the public by pre-selling your product or offering rewards. Platforms: Kickstarter, Indiegogo.
Pros:
Cons:
Best for: Physical products, creative projects, tech gadgets
What it is: Wealthy individuals invest in your business in exchange for equity (ownership). They often provide mentorship and connections.
Pros:
Cons:
Best for: High-growth startups, tech companies, businesses with a clear path to $1M+ revenue
What it is: VC firms invest large amounts ($500K–$10M+) in exchange for significant equity. They expect high growth and a big exit (acquisition or IPO).
Pros:
Cons:
Best for: Tech startups, companies that need to scale fast to dominate a market
Reality check: Less than 1% of businesses raise VC. It’s not the norm. Most small businesses never need it.
Before you raise money, figure out your minimum viable budget:
Startup costs: Website, equipment, inventory, legal fees, initial marketing
Monthly operating costs: Rent, utilities, software, supplies, marketing
How many months until you’re profitable?
Total funding needed: Startup costs + (Monthly costs × Months to profitability)
Most small businesses need $5K–$50K to start. If you need more than $100K, you’re either building something ambitious or overcomplicating it.
Sarah’s startup costs:
Her funding: She uses $12,000 from personal savings and gets a $3,000 loan from her parents (0% interest, 2-year repayment). She keeps her day job for the first 6 months to cover living expenses.
Why this works: She’s bootstrapping with minimal risk. No debt to a bank, no investors to answer to. She can test the business without betting the farm.
Let’s run the numbers to see if your business can be profitable — before you quit your job and bet it all.
The 3 things you must take away from this chapter
Here’s the hard question: Can this business actually make money? Not in theory. Not if everything goes perfectly. In reality.
Too many founders skip this step. They assume if they work hard enough, it’ll work out. Then they wake up a year or two later, exhausted and broke, wondering what went wrong.
Let’s do the math before that happens.
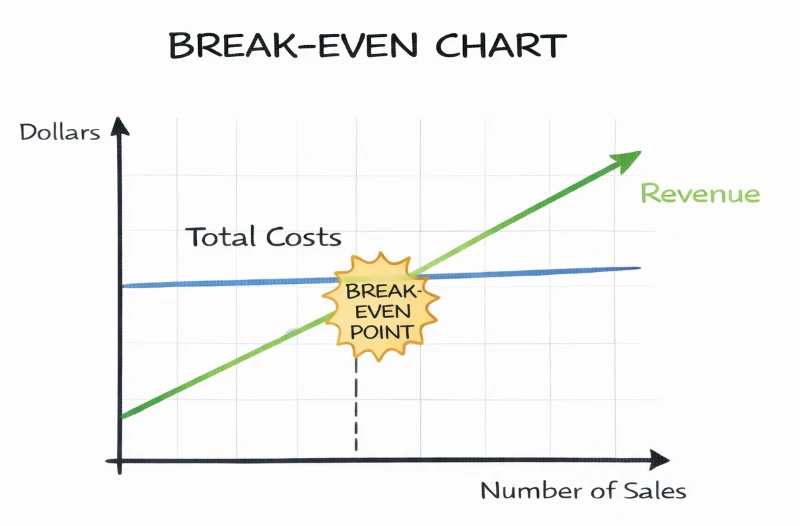
Your break-even point is the number of sales (or customers) you need to cover all your costs. Below this number, you’re losing money. Above it, you’re profitable.
Formula:
Break-even = Fixed Costs ÷ (Price − Variable Cost per Unit)
Let’s break that down:
Example: A freelance graphic designer
Break-even = $2,000 ÷ ($800 − $50) = 2.67 projects/month
She needs to close 3 projects per month to break even.
A financial projection answers three questions:
Here’s how to build one:
Step 1: Estimate your revenue
How many units (or customers) can you realistically sell each month? Start conservative. If you think you can sell 100, use 50.
Step 2: List your expenses
Break them into fixed and variable:
Step 3: Calculate profit
Profit = Revenue − (Fixed + Variable Costs)
Step 4: Test different scenarios
What if sales are 50% lower? What if costs are 20% higher? Can you still survive?
Month 1–3 (Testing phase):
Month 4–6 (Growth phase):
Month 7–12 (Scaling phase):
Year 1 total profit: Around $12,000 (not enough to quit her day job yet, but promising)
If your projection shows you can’t break even at a realistic sales volume, you have three options:
1. Raise your prices. Can you charge more and still sell?
2. Lower your costs. Can you find cheaper suppliers, cut overhead, or simplify your offer?
3. Change your business model. Maybe the idea doesn’t work as-is. What would need to change?
Don’t ignore bad math and hope it works out. Fix the model now.
1. What’s your price per unit (or project)?
2. What’s your variable cost per unit?
3. What are your monthly fixed costs?
4. How many units do you need to sell to break even?
5. How many units can you realistically sell in Month 1? Month 6? Month 12?
6. Based on the above, will you be profitable? When?
Let’s divide ownership in a way that reflects contributions, protects everyone, and doesn’t blow up your partnership later.
The 3 things you must take away from this chapter
Taking on a business partner can be one of the best decisions you make. Or one of the worst. The difference comes down to how you structure the partnership from Day 1.
Most partnerships fail because founders don’t have clear agreements about equity, roles, and what happens if things go wrong. Let’s fix that before it’s too late.
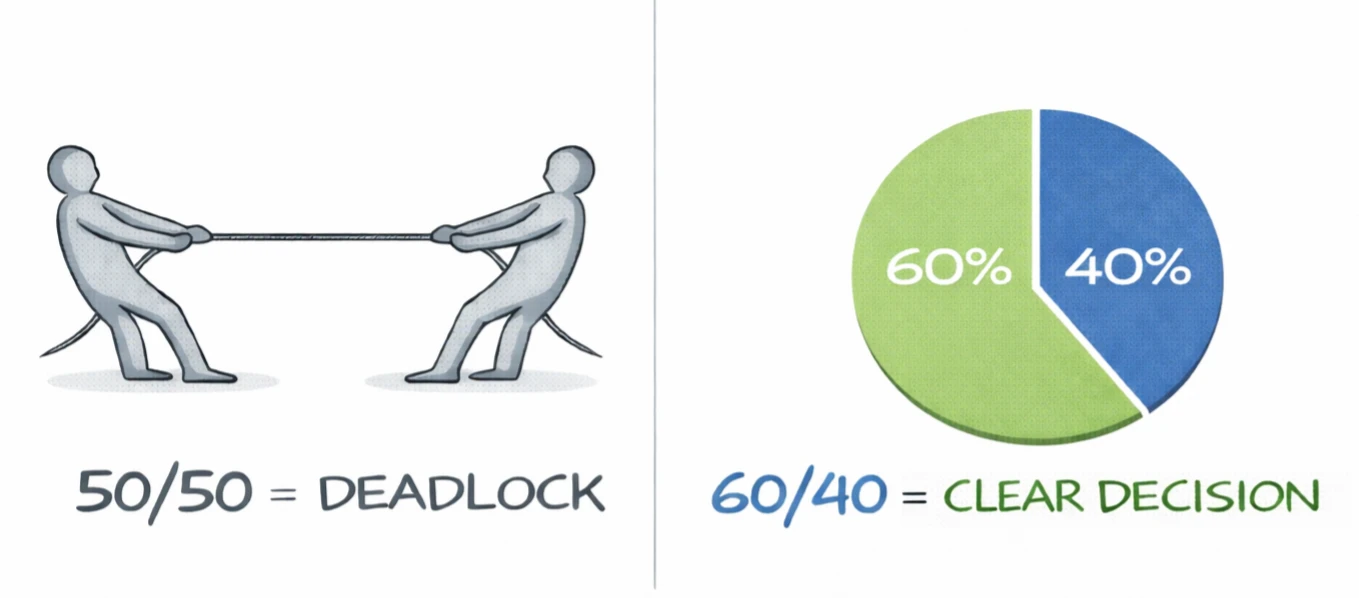
It sounds fair: two founders, equal ownership. But here’s the problem: equal equity creates deadlock.
When you disagree on a major decision — and you will — who gets the final call? If you’re 50/50, you’re stuck. Disagreements drag on. Resentment builds. The business suffers.
Better approach: Split it 51/49 or 60/40. Someone needs to be the tiebreaker.
That doesn’t mean one person is “the boss.” It just means when you can’t agree after discussing it, someone has the final say.
Equity should reflect contribution and risk. Consider:
Example split:
The key is having the conversation upfront and agreeing on the logic.
Here’s a nightmare scenario: You start a business with a partner. You split it 50/50. Three months in, they decide it’s not for them and quit. But they still own 50% of your company.
Now you’re stuck. You’re doing 100% of the work, and they own half the business. You can’t bring on a new partner without buying them out (expensive). You’re screwed.
The solution: vesting.
Vesting means you earn your equity over time (usually 3–4 years). If you leave early, you only keep the equity you’ve vested. The rest goes back to the company.
Standard vesting schedule:
Example: You own 50% of the company with a 4-year vesting schedule and 1-year cliff. If you quit after 6 months, you get 0%. If you quit after 2 years, you get 25% (half of your 50%).
This protects everyone. No one gets a free ride for work they didn’t do.
Don’t rely on a handshake. Write a partnership agreement (also called an operating agreement or founders’ agreement). It should cover:
You can use a template (search “founders’ agreement template”) or hire a lawyer to draft one ($1,000–$3,000). It’s worth every penny.
Even with a good agreement, partnerships can sour. Here’s how to handle it:
1. Talk first. Most conflicts come from miscommunication. Have an honest conversation before things escalate.
2. Refer to your agreement. If you wrote a good partnership agreement, it should have a process for resolving disputes (mediation, arbitration).
3. Consider a buyout. If it’s not working, one partner can buy out the other. Your agreement should specify how to value the buyout (e.g., based on revenue, assets, or an independent appraisal).
4. Dissolve the business. Sometimes the best option is to shut it down and move on. Your agreement should outline how assets get divided.
Sarah’s situation: She starts the business with her friend Mike. Sarah handles roasting and operations. Mike handles sales and customer relationships. They agree on a 60/40 split (Sarah 60%, Mike 40%) because Sarah invested more money and is working full-time.
Their agreement includes:
Cost: They hire a lawyer to draft the operating agreement ($1,500). It saves them from a $50,000 lawsuit two years later when Mike wants to leave.
1. Who are your partners (if any)?
2. What does each person contribute? (cash, time, skills)
3. What’s a fair equity split based on contributions?
4. Will you use a vesting schedule? (Yes/No, and what terms?)
5. Who has final decision-making power?
6. Have you written (or will you write) a partnership agreement?
Here’s what you now know that most founders don’t when they start:
None of this is as scary as it sounded at the beginning. It’s just decisions. And now you know how to make them.
The biggest mistake isn’t picking the wrong structure or pricing too low. It’s avoiding these decisions entirely because they feel overwhelming.
So they operate as an unregistered sole prop. They don’t get permits. They don’t track expenses. They wing their pricing. They shake hands on a partnership instead of writing it down.
And then, six months or a year in, they get hit with a tax bill they can’t pay, or a fine they didn’t see coming, or a partnership dispute that kills the business.
Don’t be that founder.
Assuming you've done extensive testing and validating to make sure your business is on solid ground, pick one thing from this guide and do it this week:
You don’t have to do everything at once. Just start. Progress beats perfection.
The legal and financial side of your business isn’t the fun part. You didn’t start this business to file taxes or read operating agreements. You started it because you have something to build.
But this stuff protects what you’re building. It keeps you out of trouble. It saves you money. It lets you focus on the work that actually matters.
So handle it once, handle it right, and then get back to building.
You’ve got this.
If you worked through this guide, you've tackled the part most founders avoid: the legal and financial setup that protects your business and keeps you out of trouble.
This isn't the sexy part of entrepreneurship. Nobody dreams about choosing between LLC and S-Corp, calculating break-even points, or filing trademark applications.
But you know what's even less sexy? Getting sued because you didn't have proper contracts. Scrambling to pay a surprise $10,000 tax bill. Losing your business name because someone else trademarked it first. Watching a partnership implode because you never wrote down who owns what.
You just avoided all of that.
By working through this guide, you now know:
Most founders learn these lessons the hard way—through expensive mistakes. You learned them before the mistakes happened.
Now that your legal and financial foundation is solid, you can focus on what actually grows your business:
If you haven't built yet: Move to Guide 4: Build a Website That Gets Customers to create your online presence, then Guide 5: Find Your First Customers to start generating revenue.
If you're already operating: Use this guide as your checklist. Make sure you've handled each critical area (structure, permits, IP, pricing, taxes, finances). Fix any gaps now before they become problems.
This isn't the part of business that makes you excited to wake up in the morning. But it's the foundation that lets you build everything else with confidence.
You can now:
That's not exciting. That's better than exciting—it's solid.
Remember this: The businesses that fail don't usually fail because of bad products. They fail because of ignored fundamentals—no legal protection, chaotic finances, unclear ownership, pricing that doesn't work. You just handled all of that.
Now get back to building your business on a foundation that won't crack.
Tim Donahue is the founder of StartABusiness.Center, where he helps first-time founders turn ideas into real businesses without wasting years on the wrong approach.
After years of mentoring hundreds of new founders, Tim noticed a pattern: most struggle not because they lack drive, but because they skip critical foundational steps. They launch without proper business structures, ignore IP protection, guess at pricing, and avoid financial planning—then wonder why everything feels chaotic and risky.
This guide series was created to give new founders a clear, step-by-step path through every stage of starting a business: from assessing ideas and validating with customers, to setting up legal and financial foundations, building effective websites, finding customers, and scaling sustainably.
Tim's approach: No fluff. No motivational speeches. Just practical frameworks that work in the real world.
© 2025 StartABusiness.Center | All Rights Reserved